Learn how to optimize App Clip size in iOS.

Compared to a decade ago, we are much less constrained in our resources when it comes to secure application development. More efficient chips with brand new high speed technologies are continuously being launched, and developers’ focuses have been able to migrate elsewhere.
Developers mostly devote themselves to polishing UI, animations, learning AR, and crafting other cool stuff. Once Apple introduced App Clip, iOS developers became more bothered with disk space and memory limitations.
App Clip is a light version of your app that enables users to take advantage of its core features. Customers can open App Clip from the restaurant smart banner web site, for example, and make instant orders without downloading the app. Or, you can present a QR code, activating the App Clip and completing purchases within seconds.
Many developers, however, are still concerned about PCI compliance with their App Clip functionality. Fortunately, you can use VGSCollect iOS SDK to build a PCI compliant payment flow into your App Clip. Starting from 1.7.1, VGSCollectSDK can be included into App Clip and you don't have to worry about exceeding the 10mb limit size.
If you use CocoaPods, you can add VGSCollectSDK for the App Clip target. Simply make sure you have the latest CocoaPods version as well.
# platform :ios, '11.0'

target 'Very Spacy Food' do
  # Comment the next line if you don't want to use dynamic frameworks
  use_frameworks!

  # Pods for Very Spacy Food
  pod 'VGSCollectSDK'

  target 'Very Spacy FoodTests' do
    inherit! :search_paths
    # Pods for testing
  end

end

target 'VerySpacyFoodClip' do

	use_modular_headers!

    # Add VGSCollectSDK to AppClip
	pod 'VGSCollectSDK'
end
Notwithstanding the fact that App Clip is an amazing feature, a lot of developers struggle adopting App Clip to fit size limitations. Apple specifies a 10mb limit (at the time of writing this post), which refers to uncompressed binary size (universal variant of App Clip). Let’s cover some useful optimization tricks.
Don’t guess, measure and upload your App Clip
Generally speaking, the most obvious way to make sure that your App Clip does not exceed the maximum allowable size is to just upload it to Testflight with the release version of your app. It is really important to test release versions, because Xcode has different optimization build settings for Debug and Release configurations by default.
You can measure an approximate uncompressed binary size by checking the universal payload for App Clip after archiving.
- archive your app with App Clip;
- open "Organizer/Archives/YourCoolApp.xcarchive";
- open it in Finder and check the content. It can be something like "Products/Applications/YourCoolApp";
- check the content where you can find the App Clip folder.

eugene@user ~ % cd /Users/eugene/Library/Developer/Xcode/Archives/2021-02-05/Very\ Spacy\ Food\ 05.02.2021\,\ 12.51.xcarchive/Products/Applications/Very\ Very\ Spacy\ Food.app
eugene@user Very Very Spacy Food.app % du -sh *
4.7M	AppClips # Verify App Clip Size
4.0K	AppIcon60x60@2x.png
8.0K	AppIcon76x76@2x~ipad.png
4.2M	Assets.car
100K	Base.lproj
376K	CardIcon.bundle
144M	Frameworks
4.0K	Info.plist
4.0K	LoadingView.nib
4.0K	PkgInfo
4.7M	Very Very Spacy Food
 20K	_CodeSignature
 16K	embedded.mobileprovision
eugene@user Very Very Spacy Food.app %
Keep in mind that checking the universal payload should not be used for measuring the app size. The aforementioned approach is rather an exclusion and should be applied for App Clip testing only.
From Apple documentation: "However, none of the binaries that you create for debugging or that you upload to the App Store from within Xcode are suitable for measuring your app’s size."
The final application size on the specific device can be significantly different from the universal package size. Also, Apple can reoptimize app binary when the enable_bitcode feature is on. Bitcode is an intermediate representation of your compiled app. So, as Apple is incessantly crafting their tools, it can recompile your app without reuploading. If you want to reduce your application size, you should follow Apple guidelines like creating app size reports, etc.
However, don’t forget to actually upload your App Clip and make sure it is available with your app in Testflight.
Select resources wisely, consider on-demand resources
Resources are the most common contributors to big bundle size. You should consider wisely what you need in your App Clip and clean out as many unused resources as possible. These can be unused fonts, images, xibs, or audio files. Third-party tools are available to achieve this.
Additionally, you can adopt some best practices from Apple, like choosing HEIF format for images and HEVC for videos, replacing 32-bit PNGs with 8-bit versions, and playing with audio file bitrate.
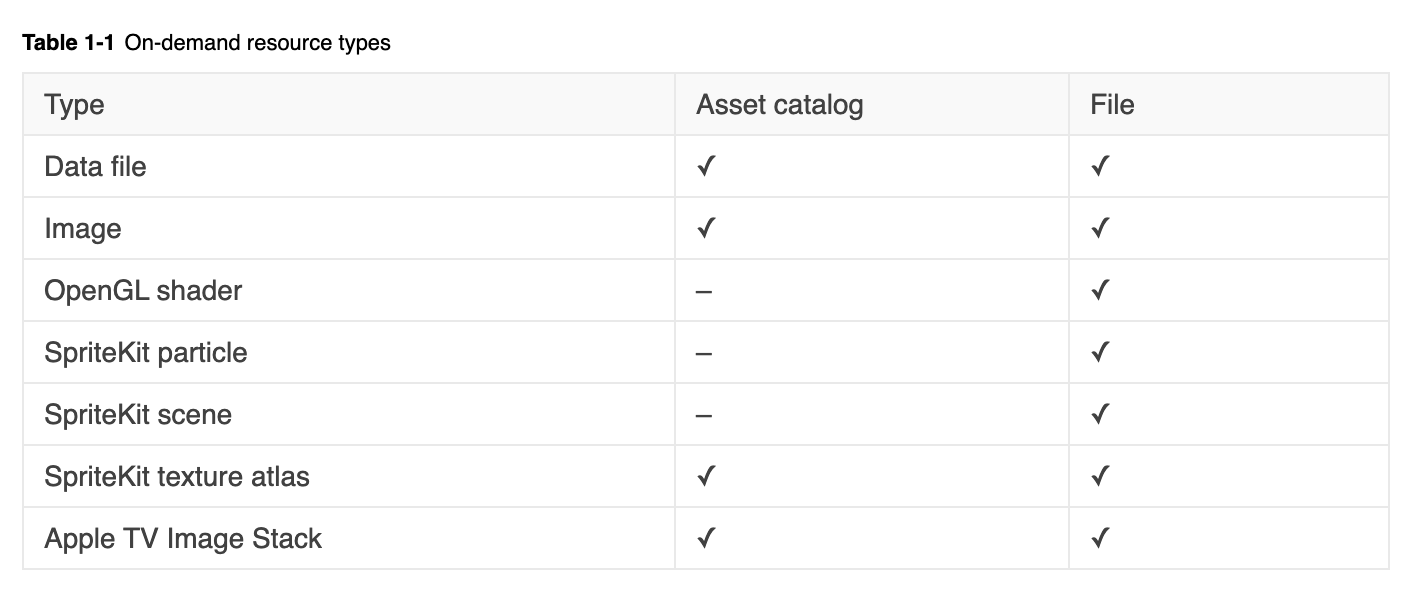
If you really need some big files (ARKit models, other data files), you can consider on-demand resources, which work as a private Apple CDN for your project. You can store some additional content on the AppStore and lazily download it later to keep your app bundle lighter.
From Apple’s official documentation:

Check assets size, try ImageOptim tool
Images are the essential part of every application. With a growing variety of devices, developers typically try to use vector resources like *pdf to ensure images look perfect on both old and modern devices.
If you still support old iOS versions and devices, please check your assets and use *.pdf format carefully.
You need to check on the "Preserve using vector data" resizing option and "use single scale mode". Under the hood Xcode can slice .pdf to .png and can dramatically increase your App Clip size.
To verify final assets, you can analyze the Assets.car file in your *ipa. We would recommend using the built-in Xcode "assetutil" command instead of different third-party tools. It will produce a JSON with information about all assets contained within. "SizeOnDisk" field can provide helpful information about final resource size.
eugene@user VeryGoodSpacyFoodClip.app % xcrun --sdk iphoneos assetutil --info Assets.car
[
  {
    "AssetType" : "Icon Image",
    "BitsPerComponent" : 8,
    "ColorModel" : "RGB",
    "Colorspace" : "srgb",
    "Compression" : "lzfse",
    "Encoding" : "ARGB",
    "Icon Index" : 2,
    "Idiom" : "pad",
    "Image Type" : "kCoreThemeOnePartScale",
    "Name" : "AppIcon",
    "NameIdentifier" : 6849,
    "Opaque" : false,
    "PixelHeight" : 80,
    "PixelWidth" : 80,
    "RenditionName" : "Icon-App-40x40@2x.png",
    "Scale" : 2,
    "SHA1Digest" : "8AD2860BC383FE7895D8146EAFF4C4AE3BD701ED",
    "SizeOnDisk" : 334
  }
  ### more info..
]
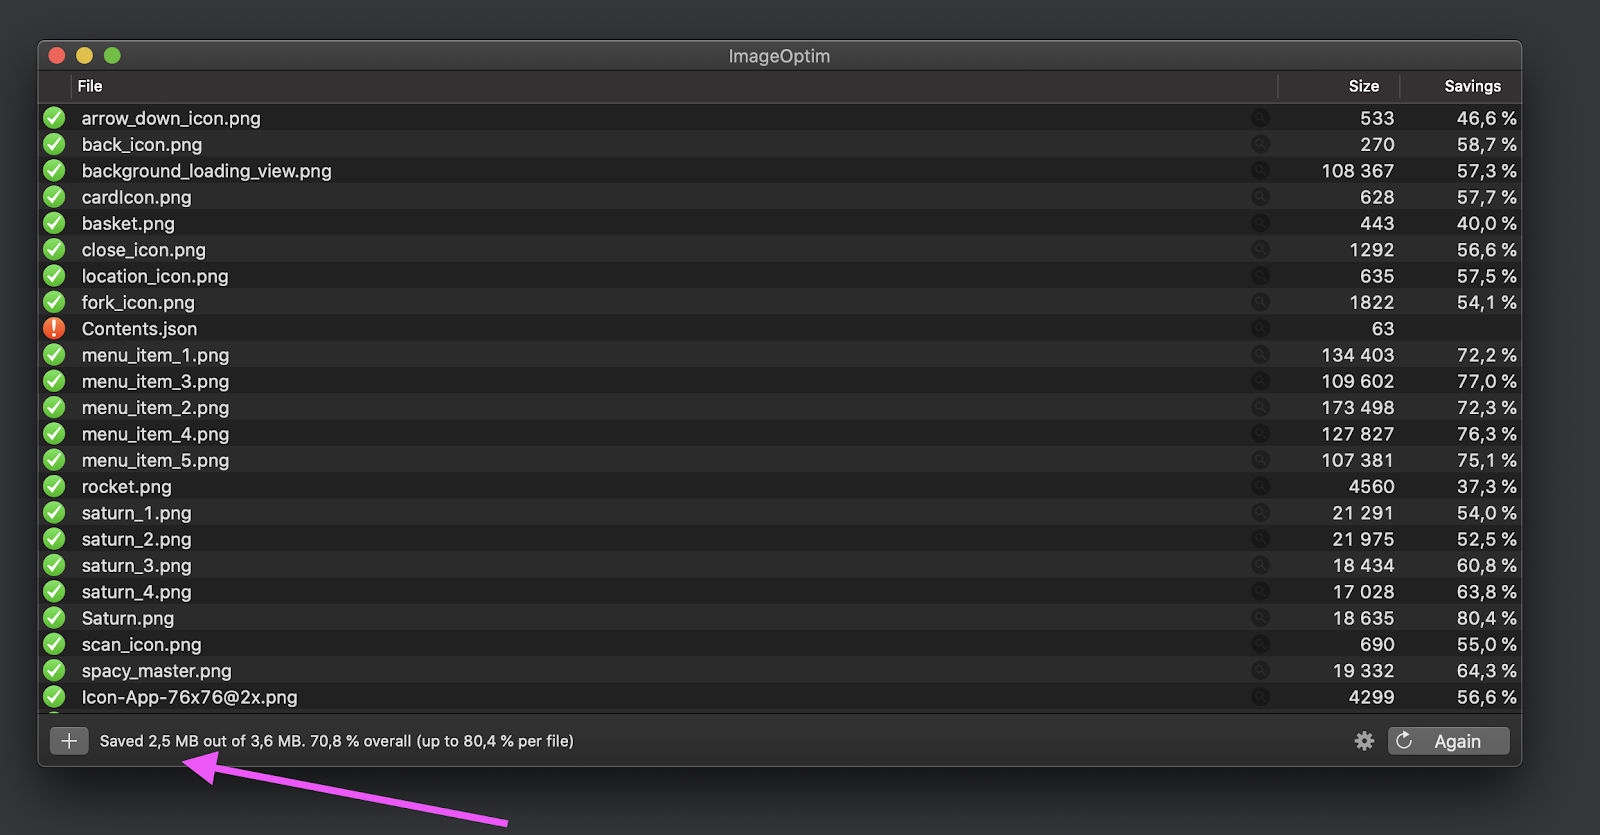
If playing with Xcode options was not beneficial enough consider migrating to png. Additionally, png images can be compressed with the ImageOptim tool. In some cases, ImageOptim can reduce the entire image’s size by more than half.

Needless to remind about the “do and test” approach.
Modularization
We have to admit that modularization is not supposed to be treated as a direct size optimization tool. It is rather a supplementary approach to simplify the mental model of the development process, hence making your work on App Clip less tedious.
Since it is just a light app version, ideally App Clip should be assembled from isolated reusable components: some modules for UI Components, API, and business logic.

Apple encourages developers to build module applications in their official documentation to avoid code duplication in the main app and App Clip. Apart from enhancing the development process, modularization in some degree ensures main app stability as well.
Indubitably test coverage is the first tool to check on product stability. Meanwhile, combinations of isolated components is a less error-prone approach than doing copy-paste or playing with if/else flags.
In some tricky cases, you can always use workarounds with Active Compilation Condition build settings creating a custom flag for AppClip.

#if APPCLIP
// Do something for App Clip only.
#else
// Execute normal flow.
#endif
Without a doubt, if you have a large enterprise product, App Clip is another decent reason for modularization. Additionally, modularization is another advantage if you foresee white labeling in your product’s future.
In the scope of modularization discussion, it is worth mentioning one typical problem in the iOS world. Lack of dependency injection (DI) tools available out of the box is a major pitfall. Usually, developers consider different open source packages to support DI.
However, building large enterprise products that rely on abundant external solutions, especially for architecture purposes, seems to not be a good idea. Simple Service Locator can be an alternative to external DI tools. This gist provides a sample for a light-weight dependency container.
To sum up, Service Locator is a dictionary container with ObjectIdentifier as a unique service name key and a corresponding service implementing a specific interface.
The key point here is to rely on interchangeable services with the same interface and different implementation. Application networking should not be dependent on some specific solution, but rather on a service implementing networking functionality.
We are not going to dive deeper into the “DI vs ServiceLocator/Service Locator as anti-pattern” topic, since an entirely separate discussion should be devoted to this subject.
Check target build settings
By default, Apple provides the Fastest, Smallest [-Os] optimization level for Release configuration. Check these flags to ensure you have the best configuration for your release builds. You can also try aggressive optimization level for size [-Oz], which may break strict compiler standards.

Swift build settings have their own 3 different levels of optimization:
None [-Onone]
Optimize for speed [-O]
Optimize for size [-Osize]

Optimization for size is an analog of Fastest, Smallest [-Os] made by LLVM. With size optimization, the compiler analyzes code to apply smarter function inlining and, hence, to mitigate code duplication. Playing with these options will not provide as much benefit as reducing resources size, although 3-5% could be a decisive factor in some cases.


