If you had one million dollars in cash, how would you keep it safe? Would you leave the pile of money on your kitchen counter? Or, would you put it in a bank? Most people would choose to deposit their money in the bank for safekeeping, or at the very least put it in a safe. We immediately feel the power of its tangible value. But what about data? If the data your organization has accumulated was worth one million dollars, how would you store it? You may think that there’s no way your data could be worth so much, but the reality is that you are probably severely underestimating the value it truly holds - and is still waiting to be unlocked.
In 2017, Equifax, one of the three largest credit agencies in the US, was hacked, leaking the sensitive personal information of 147 million people. The estimated cost of this data breach was $600 million. In September 2018, Facebook announced a data breach that could possibly impact 50 million users and is now facing a $1.63 billion fine in Europe. Just one data breach can be costly, even if your organization is not a massive corporation like Facebook or Equifax.
Keeping your money safe is no easy task, but keeping data security safe is an even more challenging task. It’s much more difficult. You need to proactively monitor your systems, continuously watch new vulnerabilities and patch software, and hire a third-party firm to do regular penetration tests, and even then, a data breach can still occur.
On top of being costly and challenging, data security is rarely a top business priority. Putting it on the back burner can end up being disastrous. However, if I told you that protecting sensitive data isn’t actually that resource intensive, would you do it differently? The solution is much simpler than most organizations think: just use a data vault.
What is a data vault? Why it is safer?
In the same way that we pay to lock away our money and valuables in a bank’s secure vault, you can also safely store sensitive digital information in a data vault - which has quickly become a must-have security measure for top companies.
What is a data vault? It is a highly-guarded and constantly monitored storage server where you can keep your sensitive data. Data vaults are extremely difficult for cyber attackers to penetrate, making them one of the safest options for storing important information.
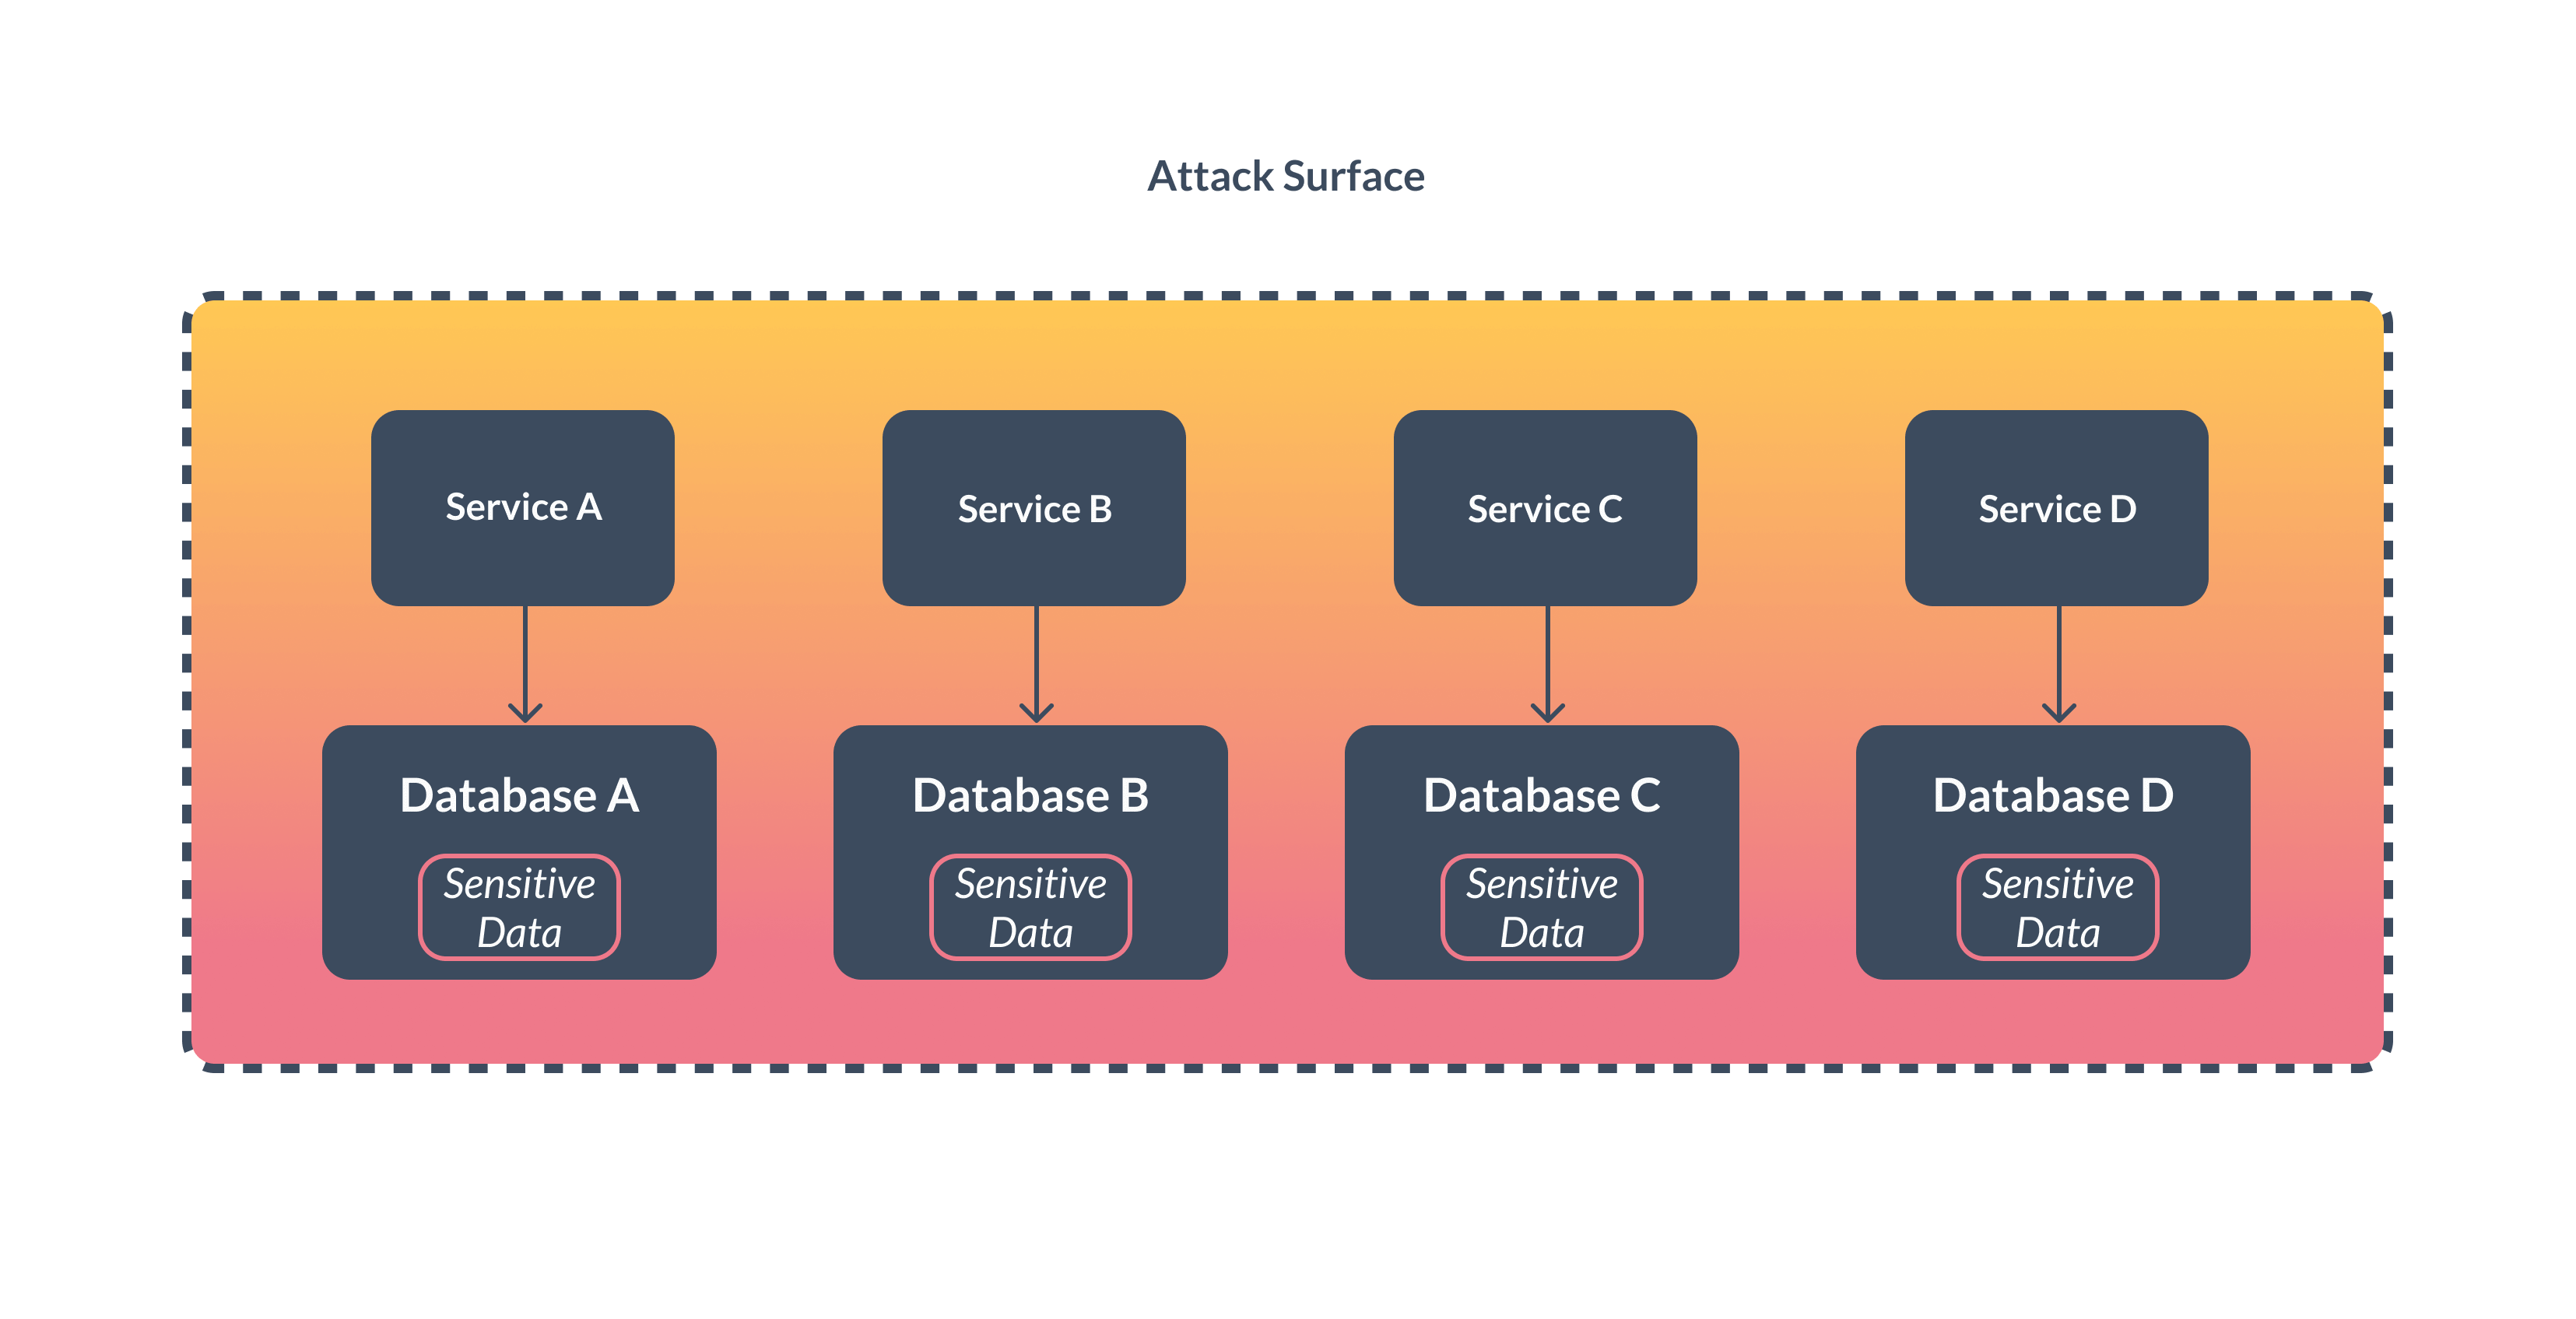
A data vault is significantly more secure than spreading your “secret” data across databases and servers, since guarding a single point of vulnerability is always much easier. The more parties with access to the data, the higher the probability that one of them will end up being a weak point. To put it simply, the risk is higher when the attack surface is larger. In contrast, when all sensitive data is locked in a single vault, intensive and concentrated security resources can then be intelligently invested to ensuring its safety.
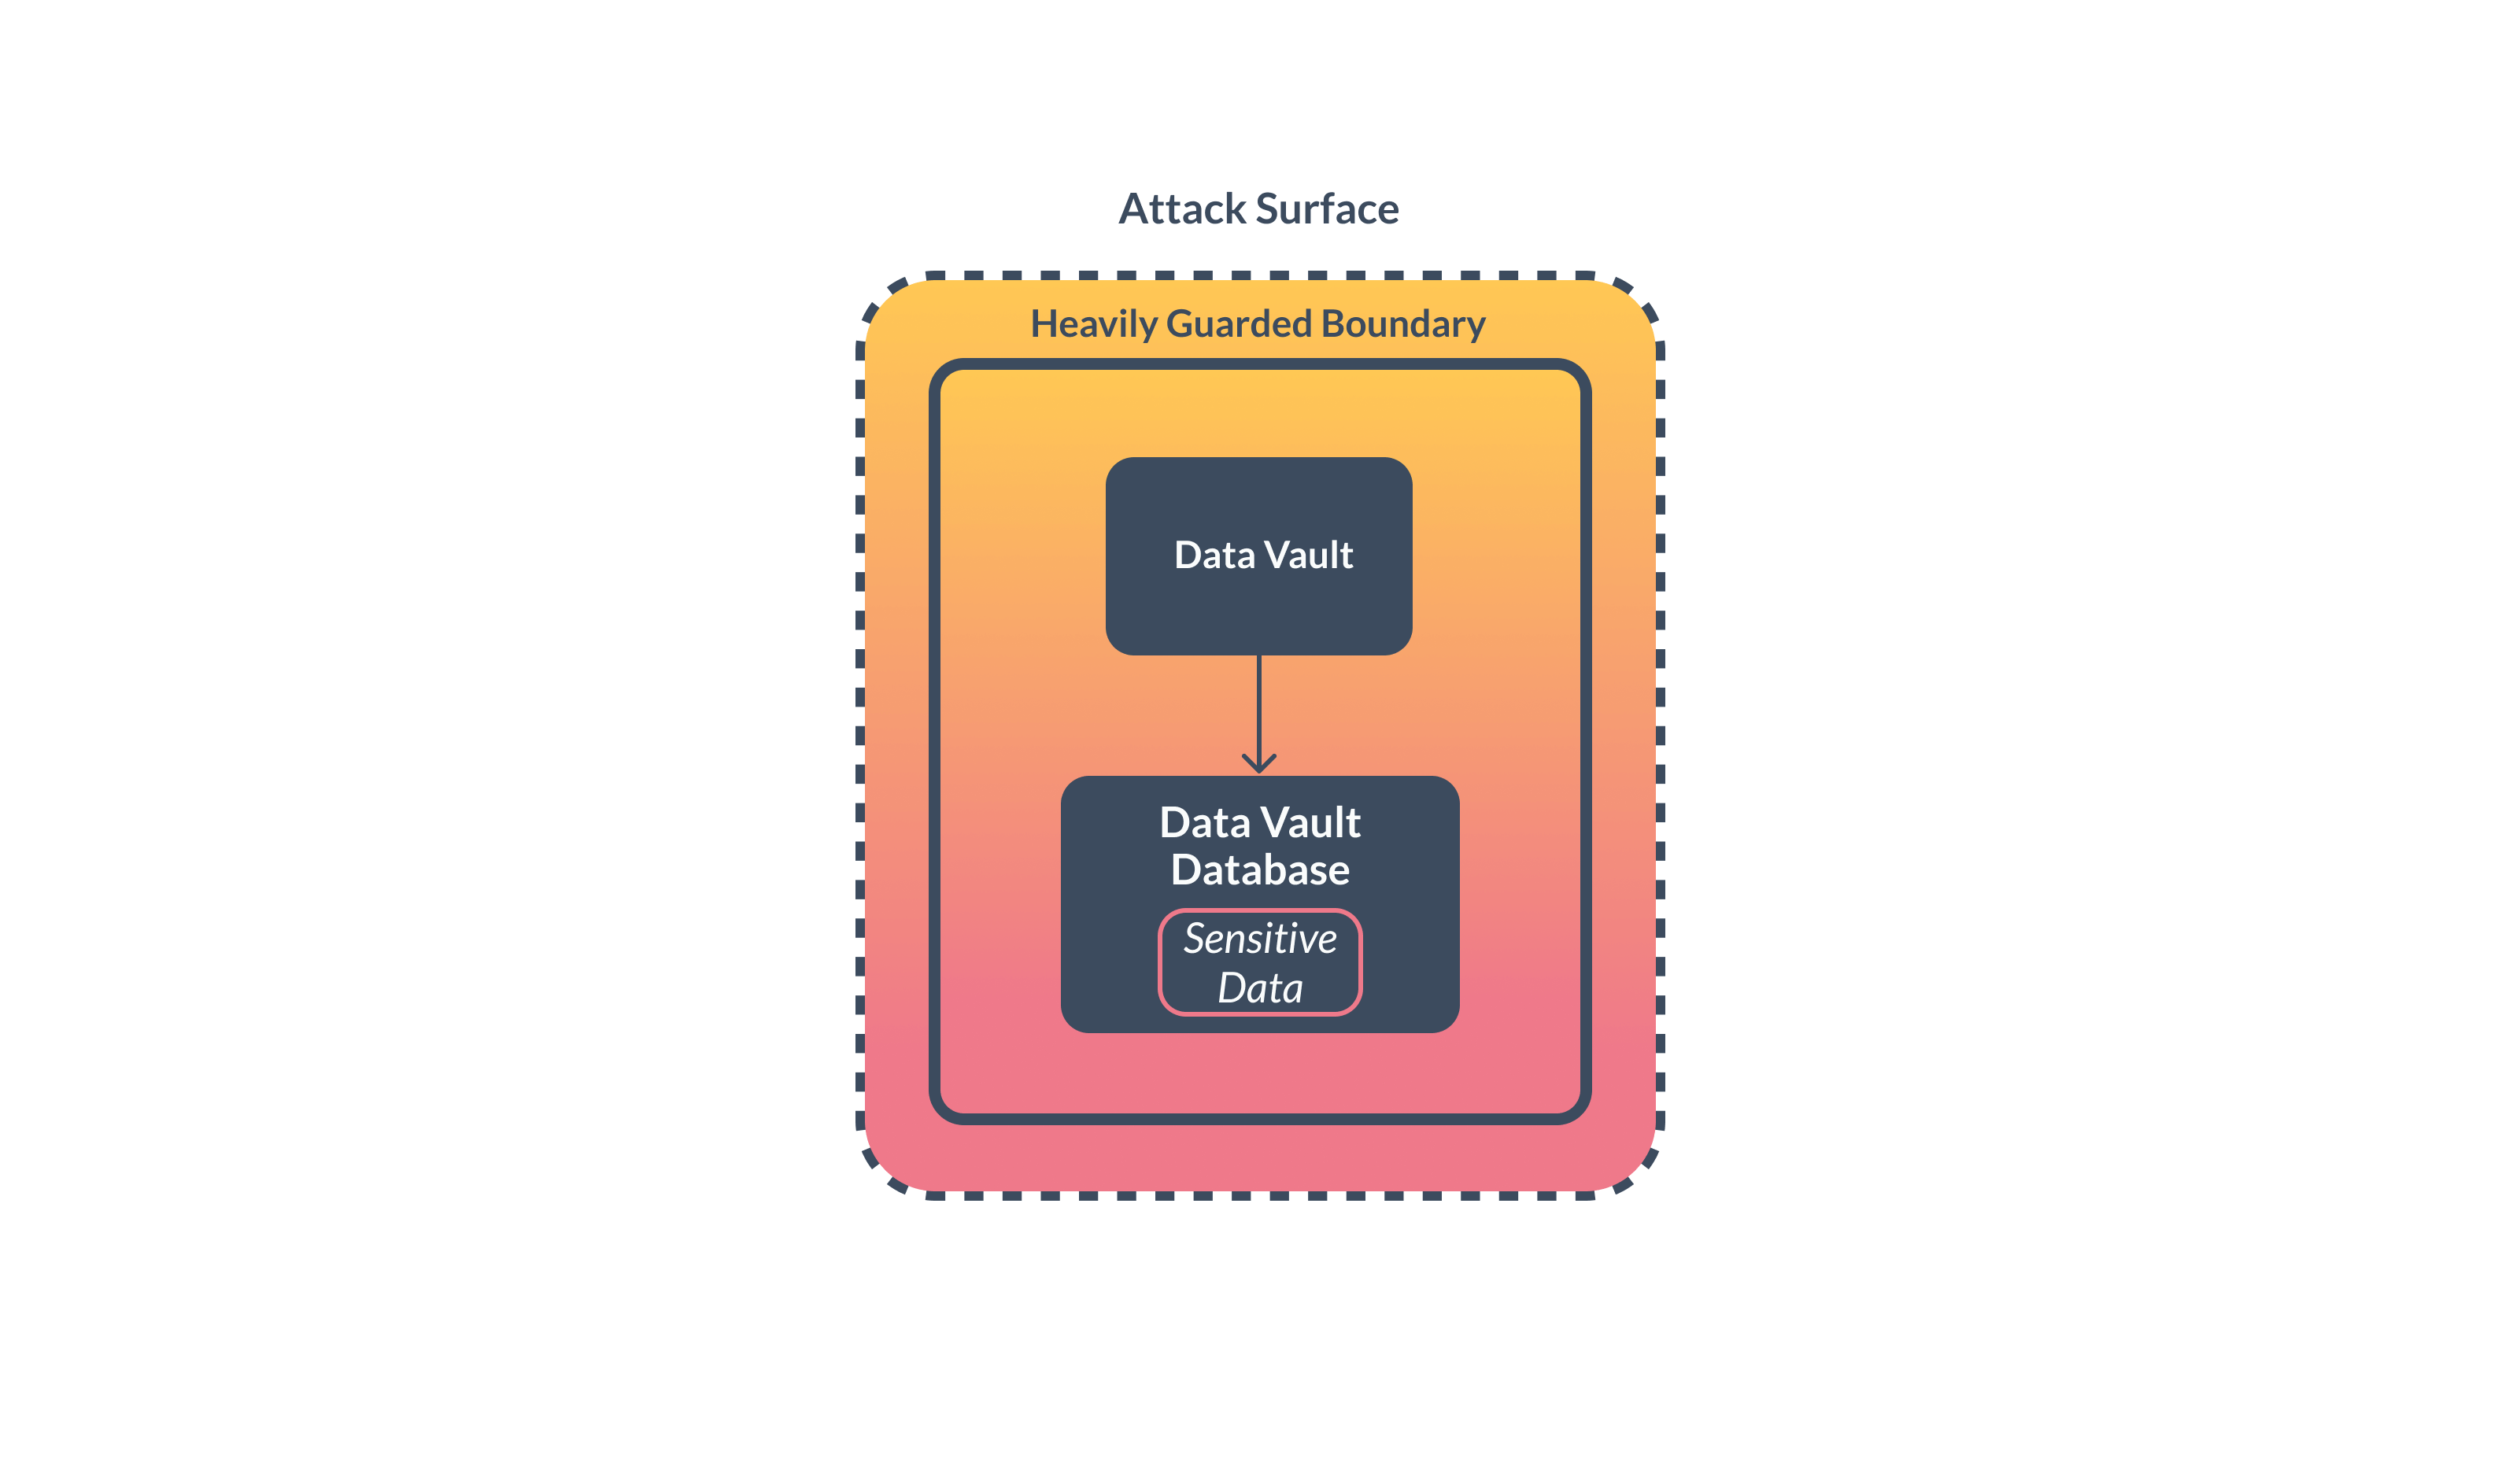
Locking all sensitive data in a heavily-guarded server is more secure, as the attack surface is much narrower.
Even by trying to keep your data safe with a data vault, building and running one is very arduous. If companies decide to run their own data vault system, they require a dedicated team of security experts which is very costly. Fortunately, in the cloud era, you can delegate building and maintaining a vault to experts like VGS. Moreover, thanks to the efficient VGS data vault design, the integration process is super straightforward. Today, I will show you how to secure sensitive data and prevent million dollar data breaches in just 10 minutes with VGS.
Example: A website that provides credit scores
Let’s assume you are a tech startup engineer who needs to build a website that lets users check their credit score online. You probably already know that credit score inquiries require you to provide your SSN (Social Security Number), the most sensitive pieces of your personal data since they are linked to many other types of private records. The source of anyone’s credit score is a consumer credit reporting agency, such as Equifax. We built a simple web app in Python with Flask, using minimal features, which allows users to sign-up with their email and SSN. Afterward, by inputting their email again, a request for their credit score is made.
The first thing a user can do is create an account by submitting their email and SSN to the web app, like this:
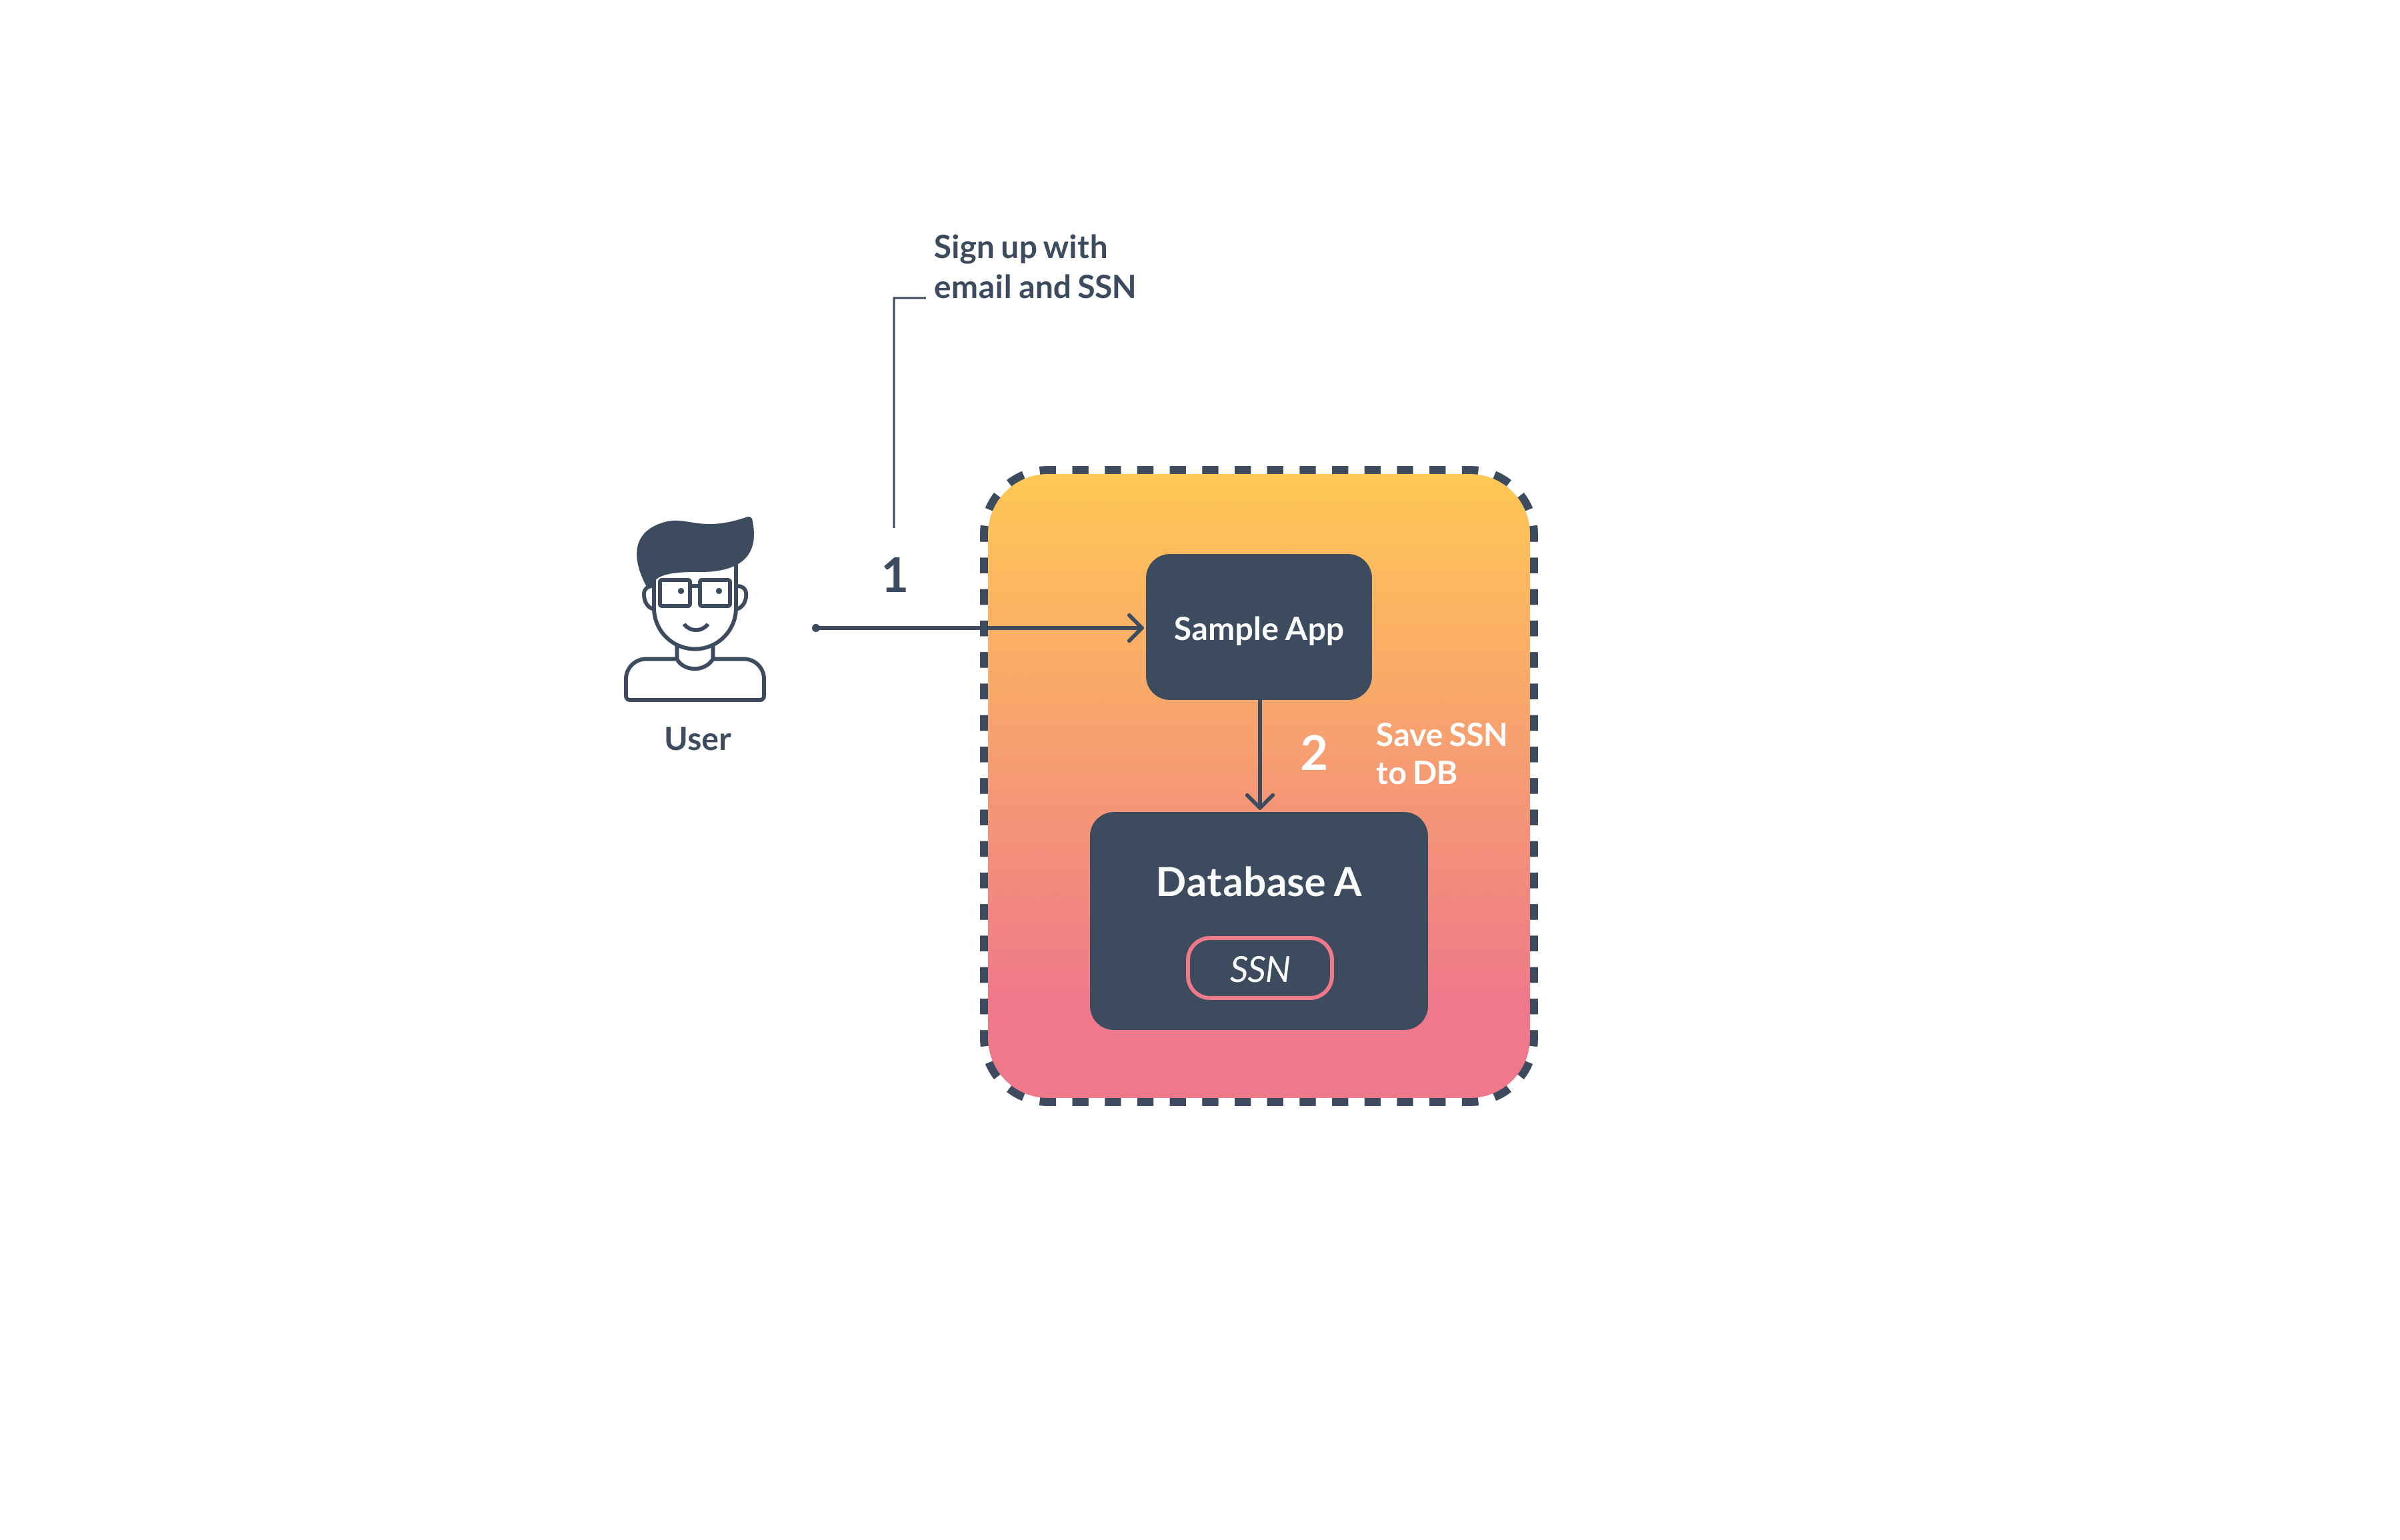
To make the app simple, we don’t check for a password. The database user schema is defined like this:
class User(db.Model):
    id = db.Column(db.Integer, primary_key=True)
    email = db.Column(db.String, unique=True, nullable=False)
    ssn = db.Column(db.String, unique=True, nullable=False)
You can see that we simply put email and SSN into the user table. The source code for this example app can be found here.
Next, let’s assume there’s a third-party API endpoint that allows us to send the SSN over, and it will return the corresponding credit score. For the sake of simplicity and demonstration purposes, we also built a simple API web app here that returns randomized credit score by hashing a given SSN.
The whole repo can be found here.
With this credit score API, we can then allow users to input their email and query their credit score like this:
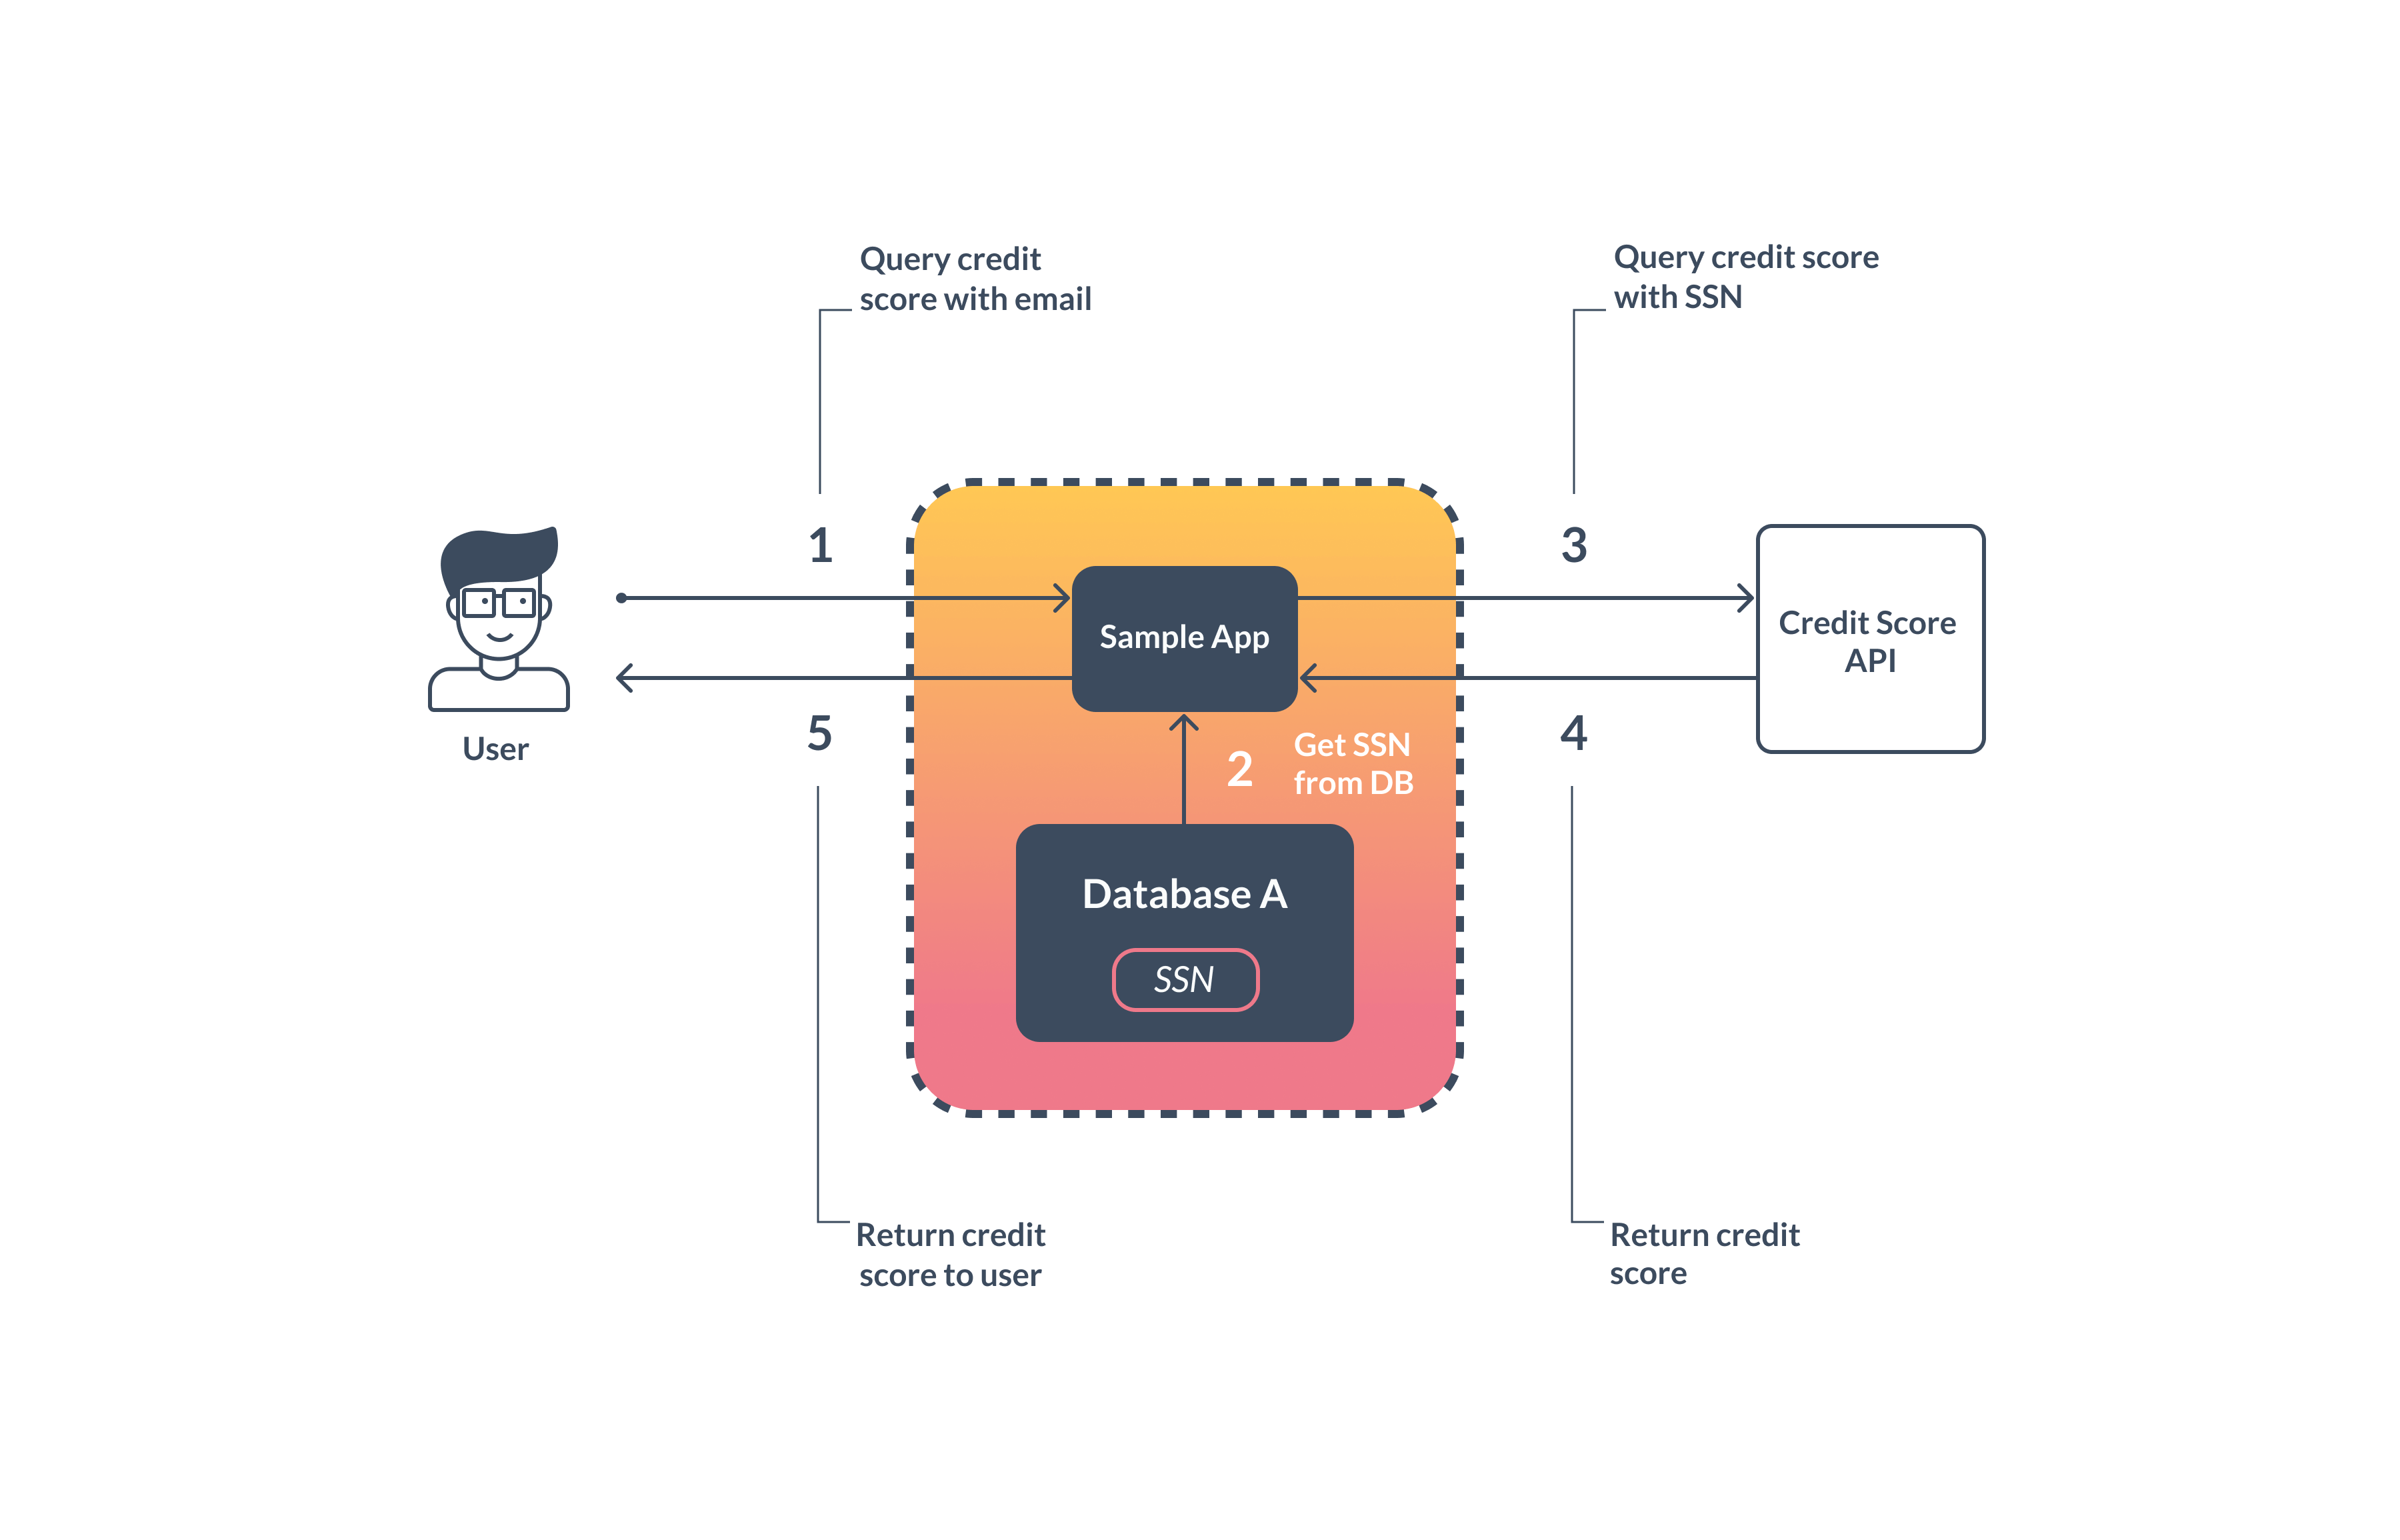
For now, the app allows the user to query their SSN. Like we mentioned before, ensuring the best security engineering practices is no easy task. It’s challenging for big companies, let alone startups. A data breach can easily arise as a result of simply forgetting to patch security vulnerability on time, just like this:
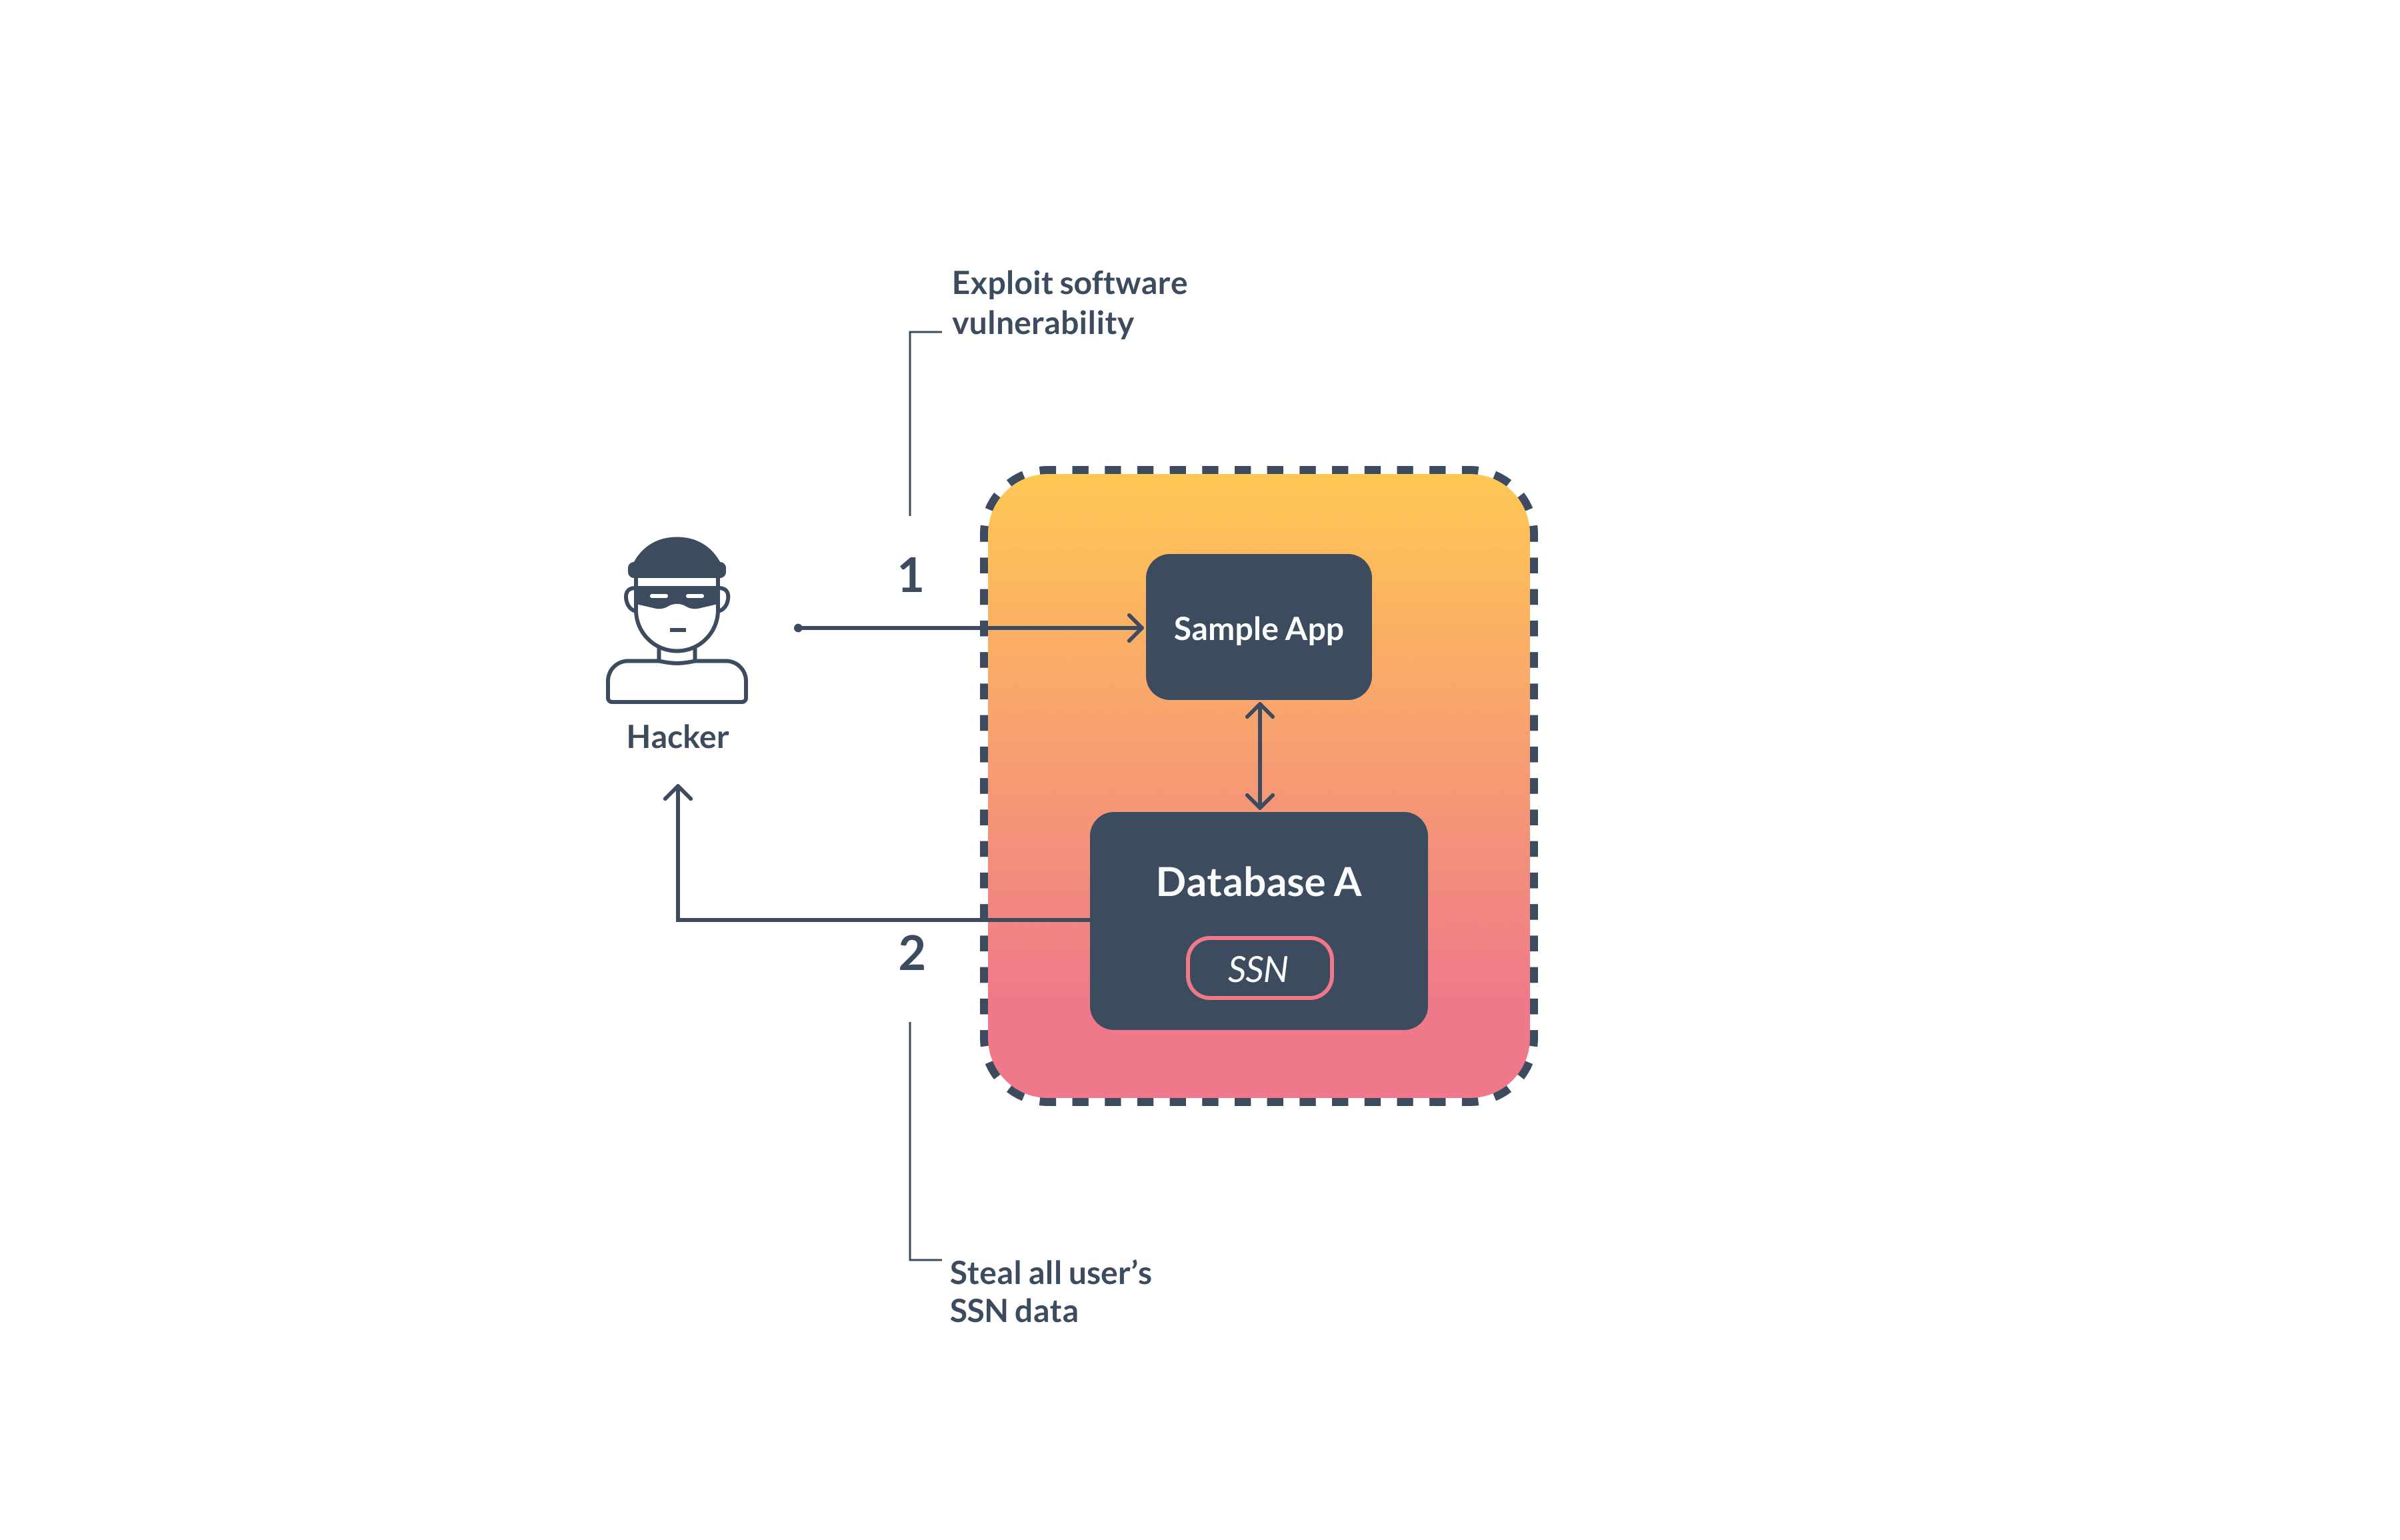
Use VGS’ data vault to protect yourself from leaking data to hackers
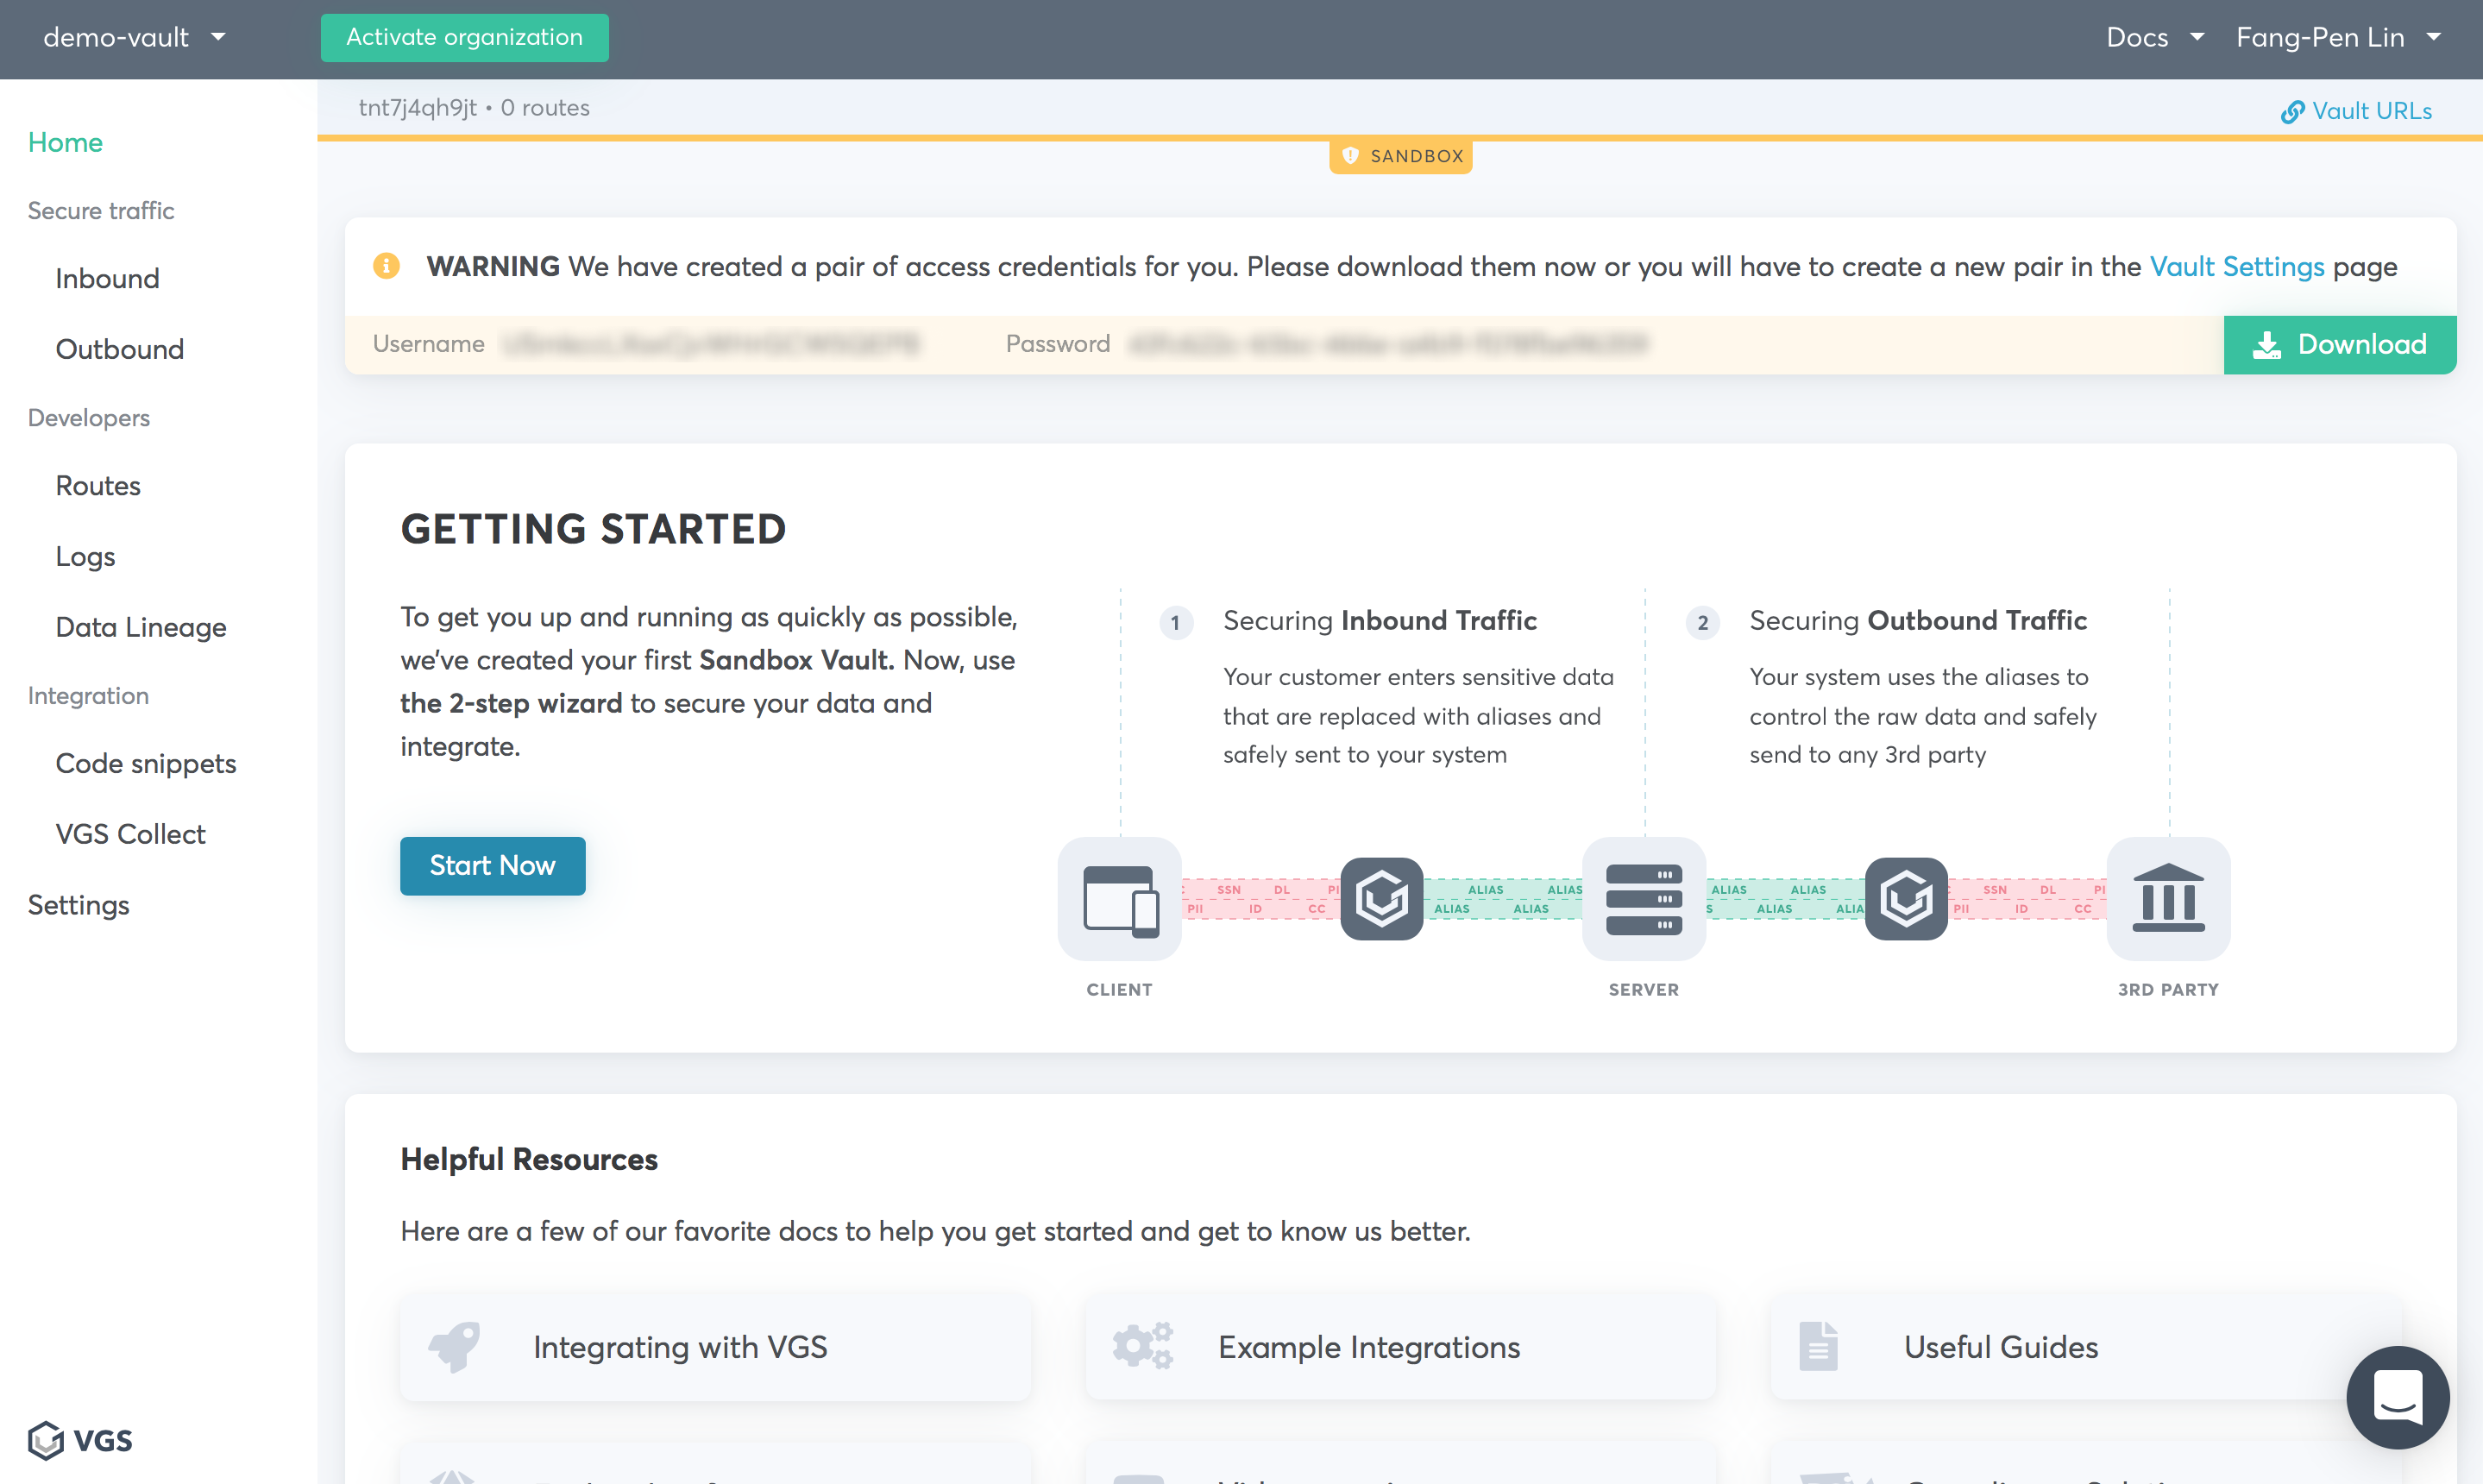
With such sensitive information flowing through our test program, it’s frightening to think what could happen to our app and its users. Fortunately, it’s extremely easy to utilize the VGS data vault to protect your critical data from cyber attackers. It takes only 10 minutes to go through the simple steps and modify a few lines of code before your app is secure. The first thing we need to do is create a VGS data vault: click on the left top corner of the current vault name and click “Add vault” button, then input your vault name and click “Create Vault”.

Next, the best way to prevent data leaks is to first secure it from your end. We want to secure the data before it even hits our server, to maximize end-to-end protection. With VGS, you can easily set up an ingress route that accepts incoming requests and replaces sensitive data with aliases in real time.
An alias is just a unique ID that corresponds to the real data stored in the actual data vault. As it has nothing to do with the real data, even when the alias is leaked, it’s meaningless to anyone who gets their hands on it. Aliases are useless to attackers because they cannot be deciphered as the corresponding data in the data vault.
After creating the data vault, click the “Download” button to save the credit system generated for us (we will need to use it later) then click on the “Enter host name” button.
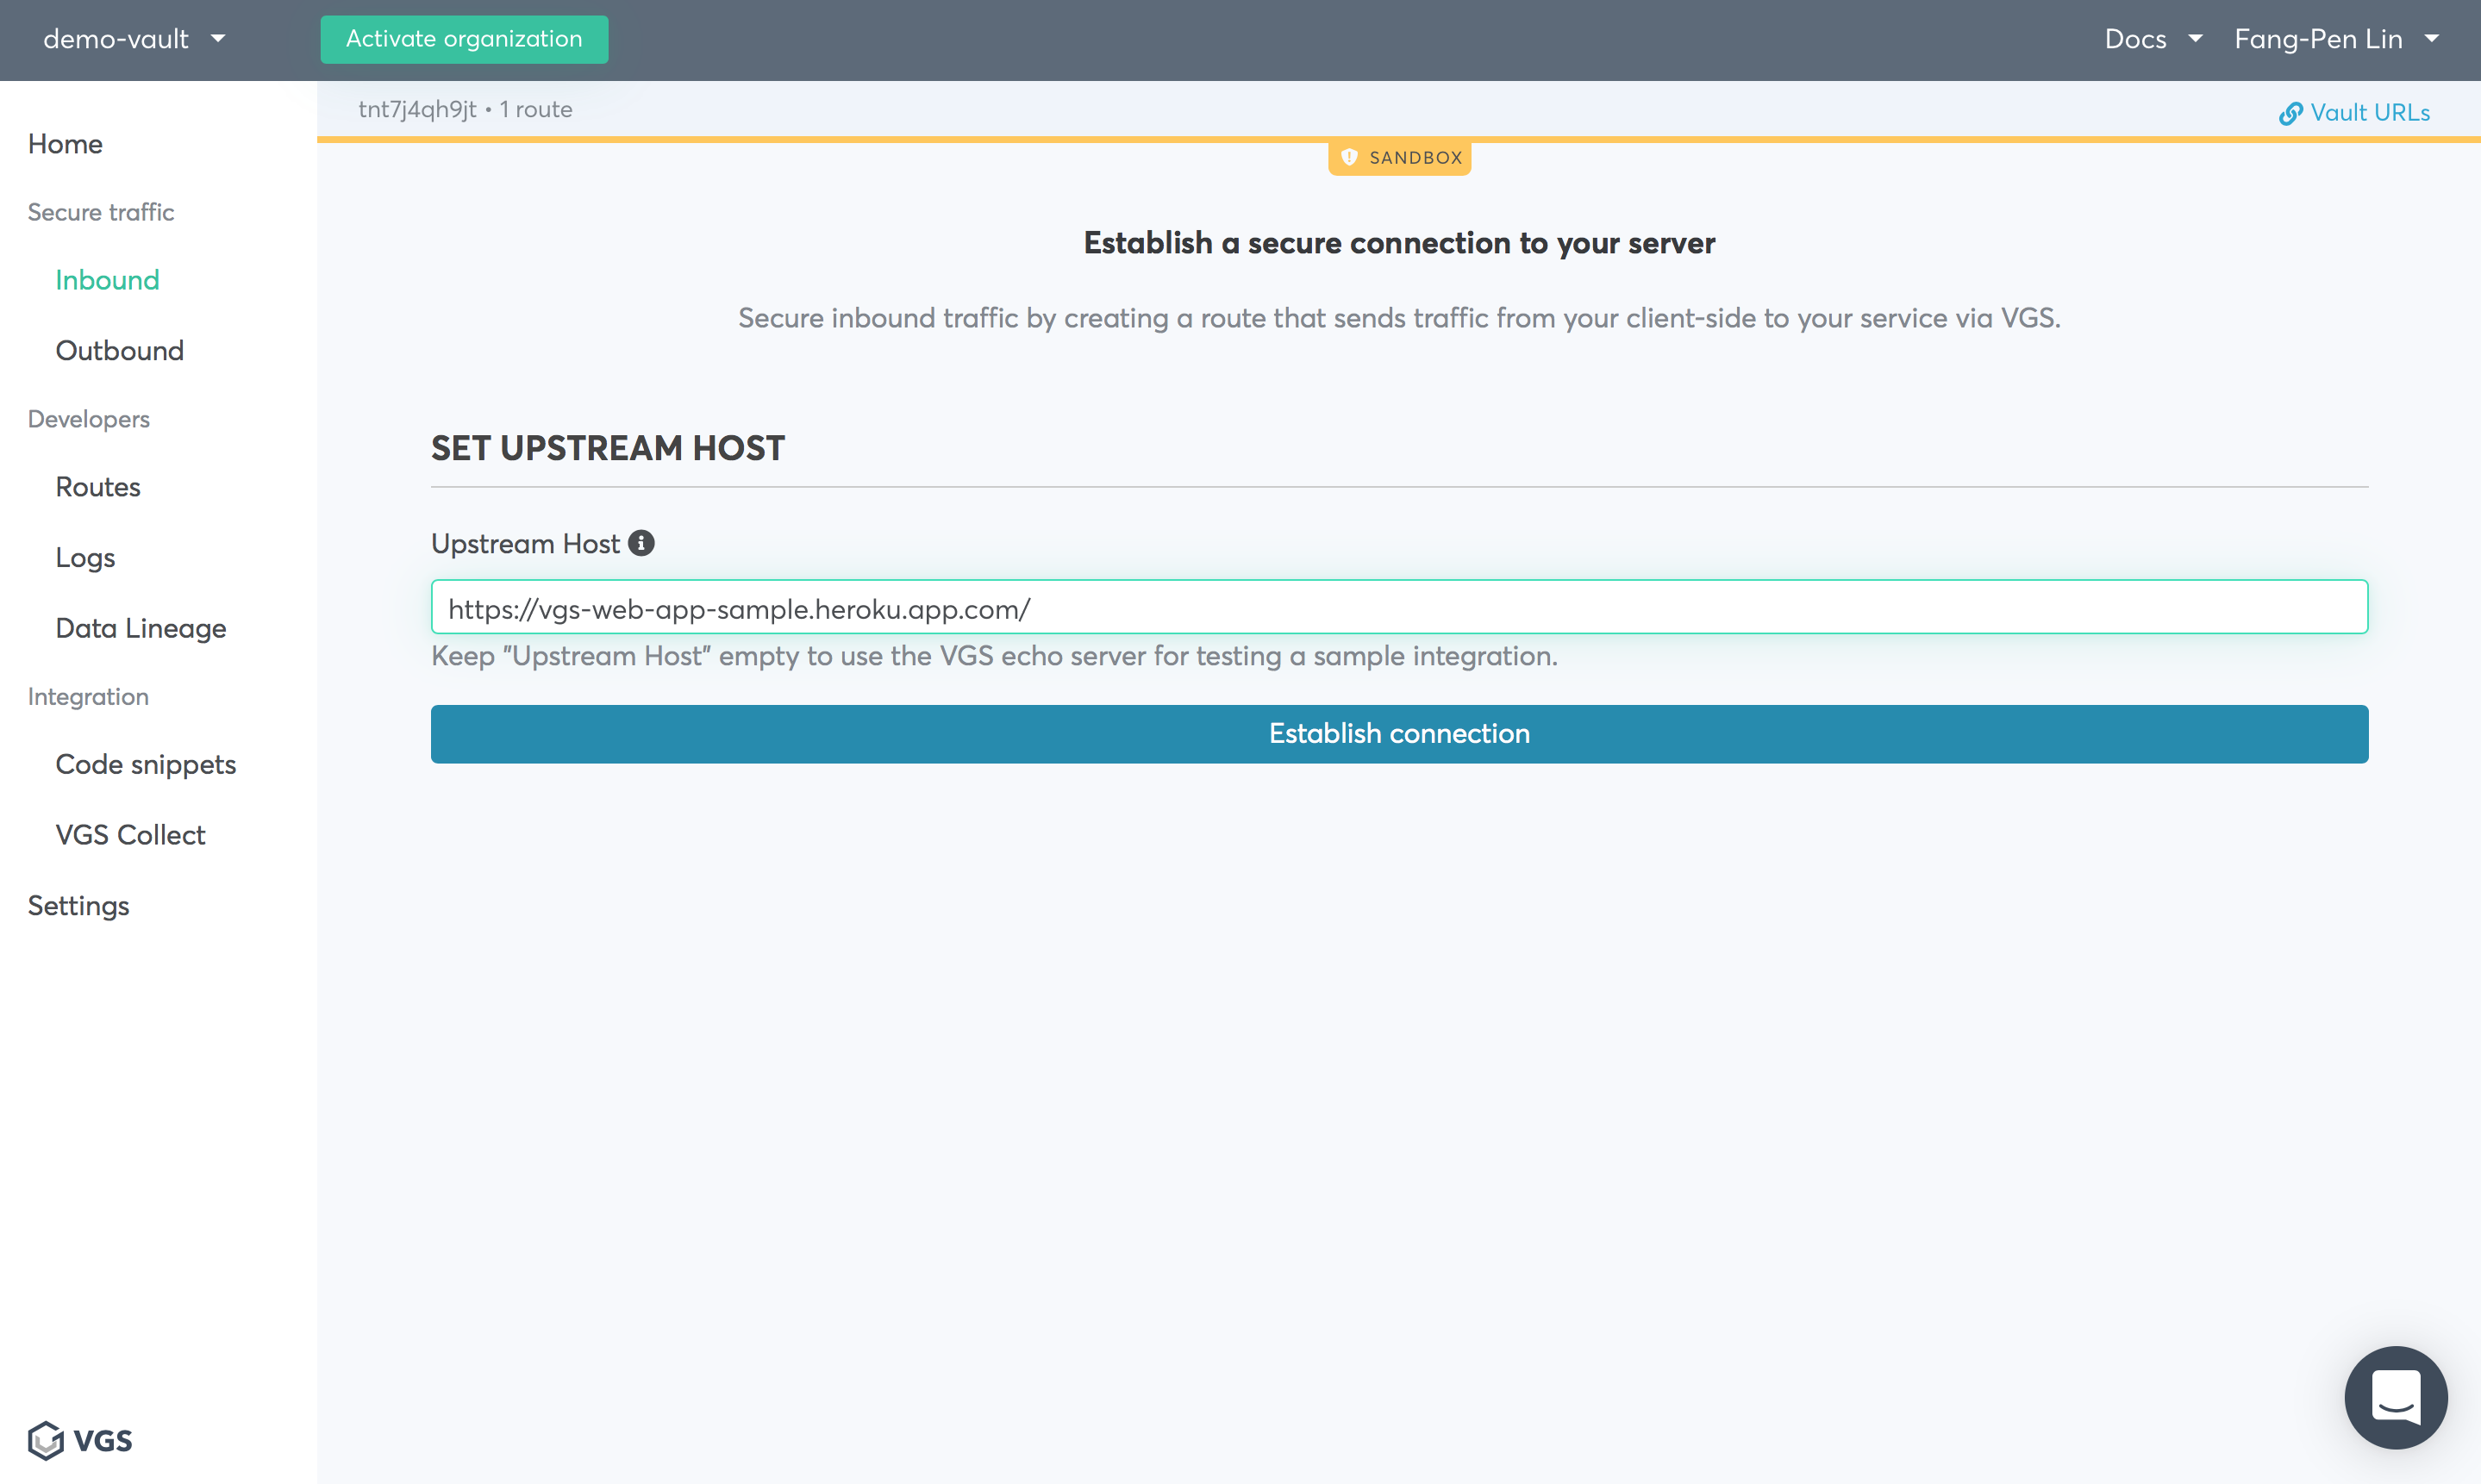
Next, enter our web app URL:
Once the hostname is set, you can send the data you would like to secure. At this page you will also see how Access Logs captures the request. So right now, we are actually waiting for requests so that we can decide how to replace the sensitive data.
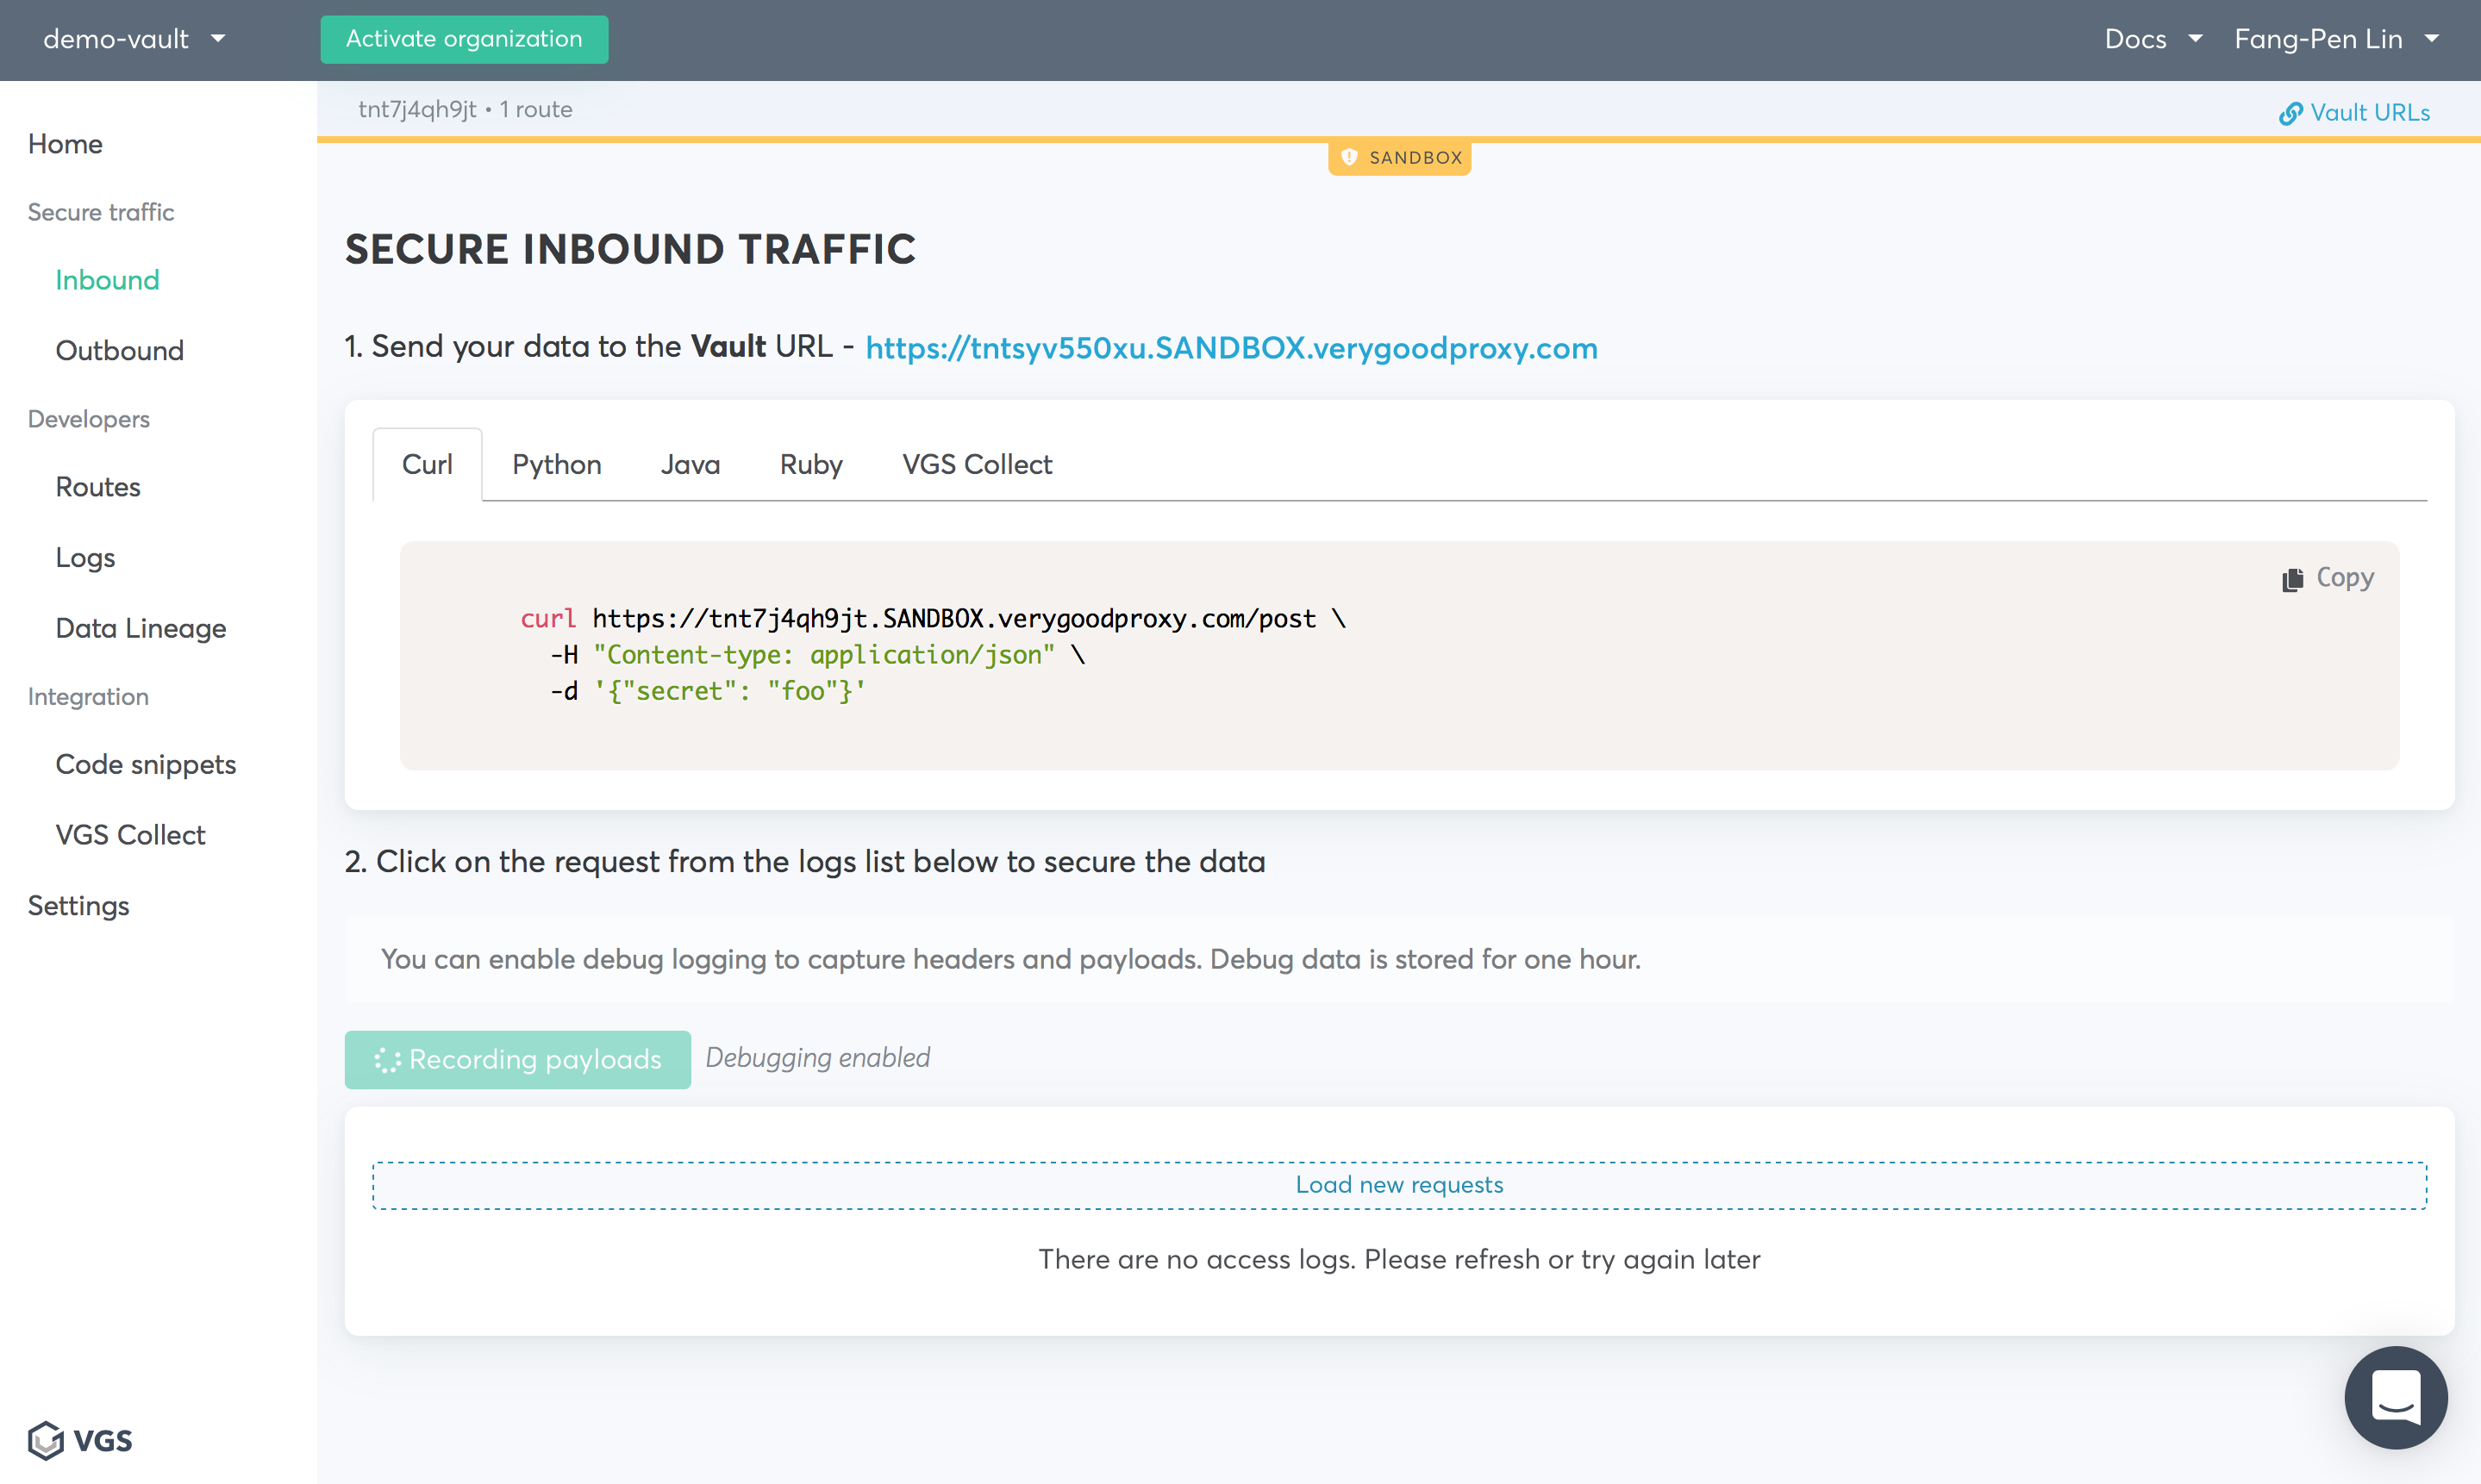
As we now know, our inbound traffic route’s URL is “https://tntsyv550xu.SANDBOX.verygoodproxy.com”, so let’s change our sign-up form upload URL to this route instead. We do this by changing the sign-up from HTML
<form method="POST">
    ….
</form>
to
<form method="POST" action="https://tntsyv550xu.SANDBOX.verygoodproxy.com/sign-up">
    ….
</form>
Next, you can visit the sign-up form web page, and submit. Then you should be able to see the POST request hit our VGS inbound traffic route server.
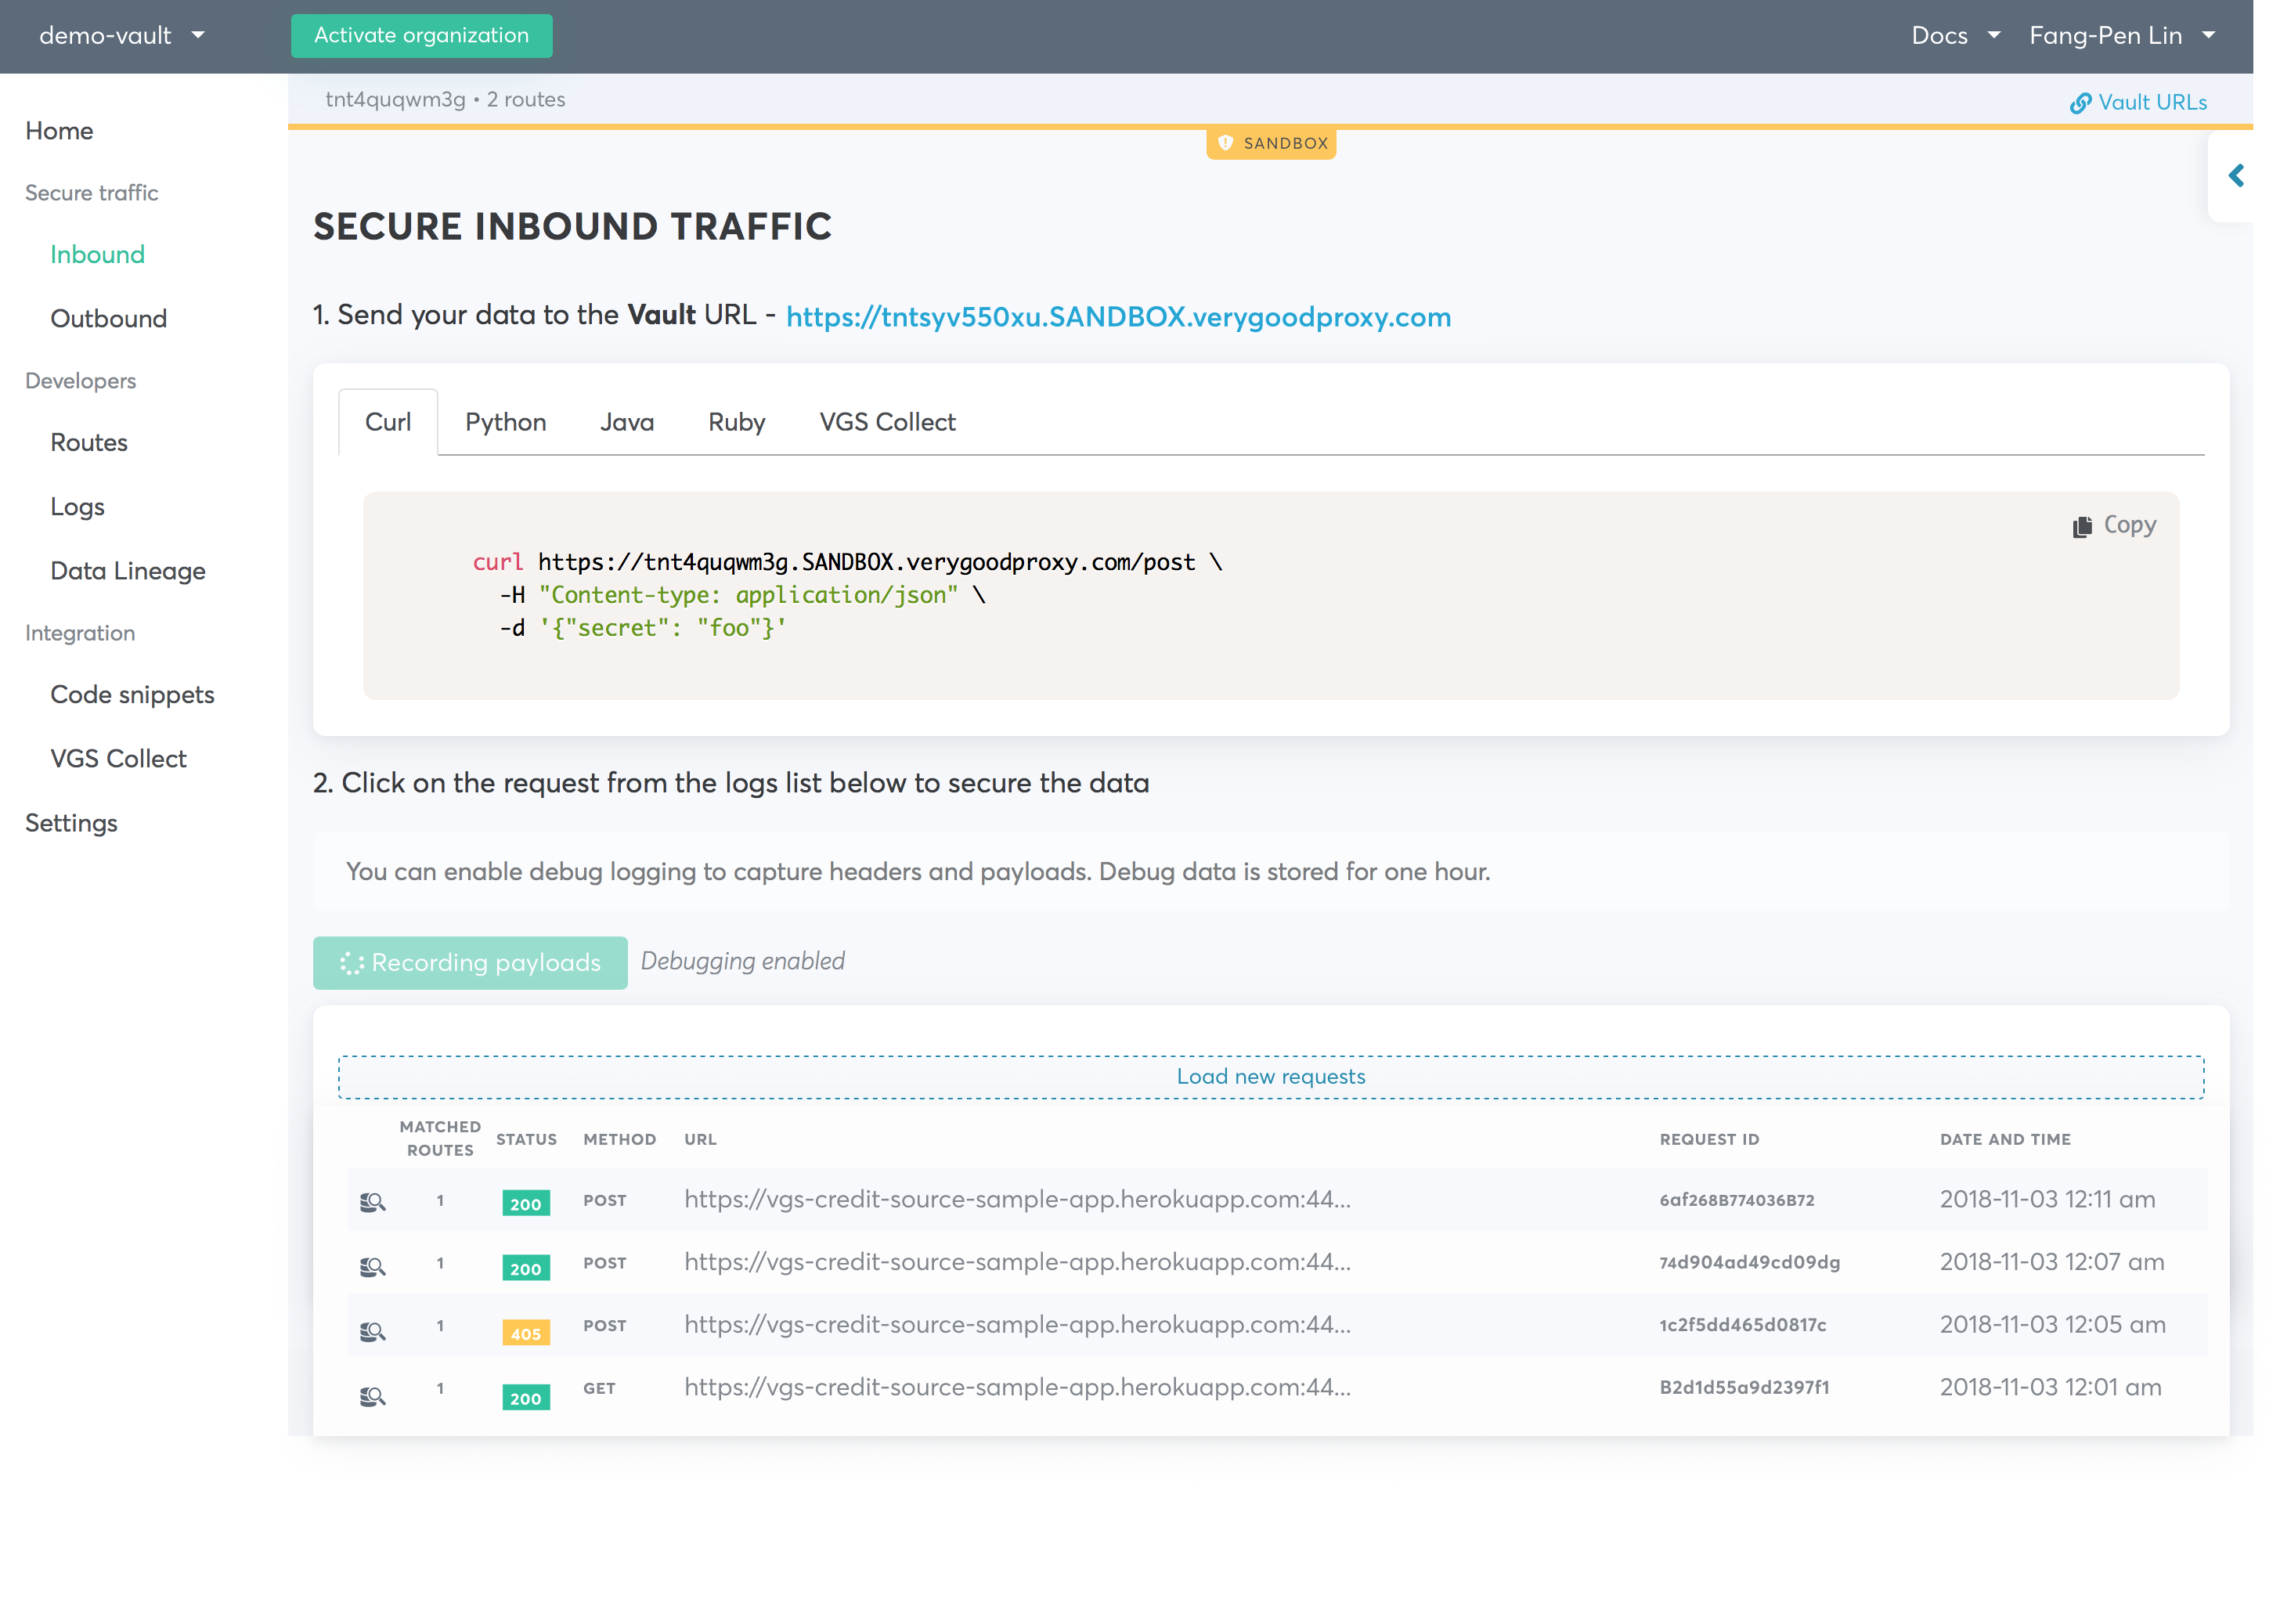
You can click on it, and click the “Secure this payload” button.
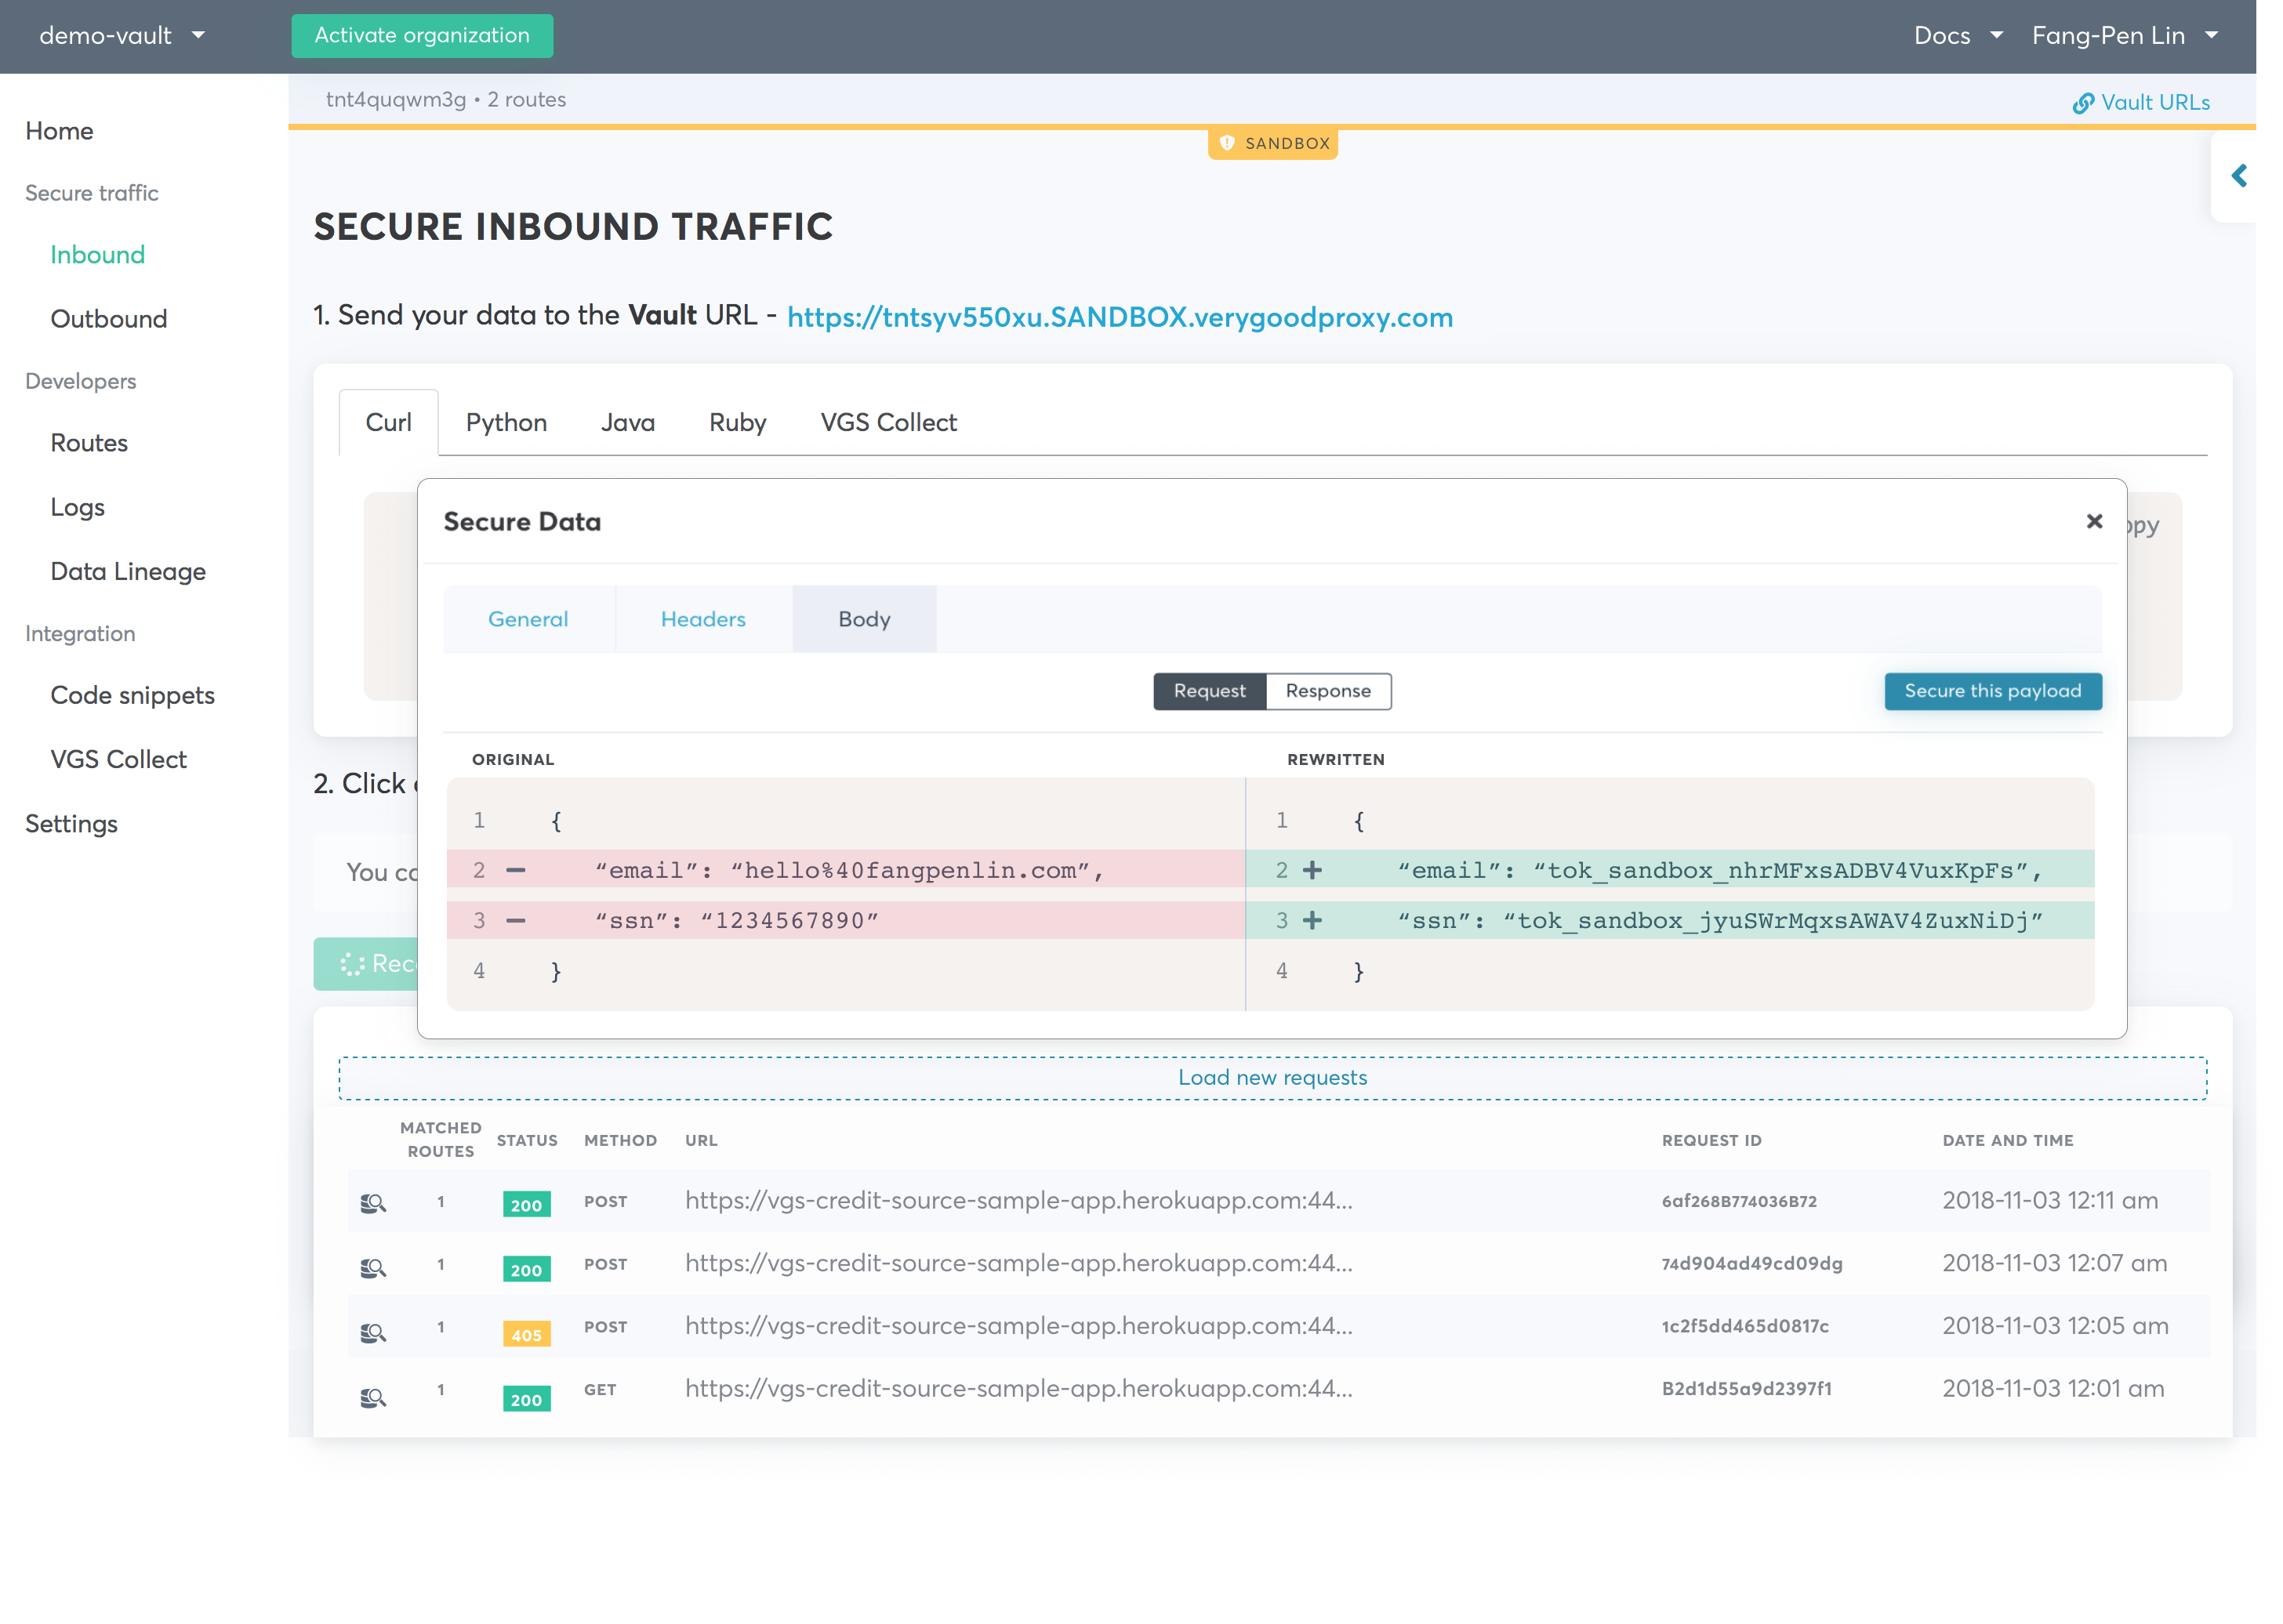
In this case, we only want to secure SSN, so we select “ssn”, and make the operation “Redact” to replace the sensitive data with an alias, and make the storage “Persistent” to keep it saved in the vault. Also set the format to Generic. And, finally, click “Secure this payload”.

Next, we can hit “Save” to save this route for replacing each SSN with an alias.

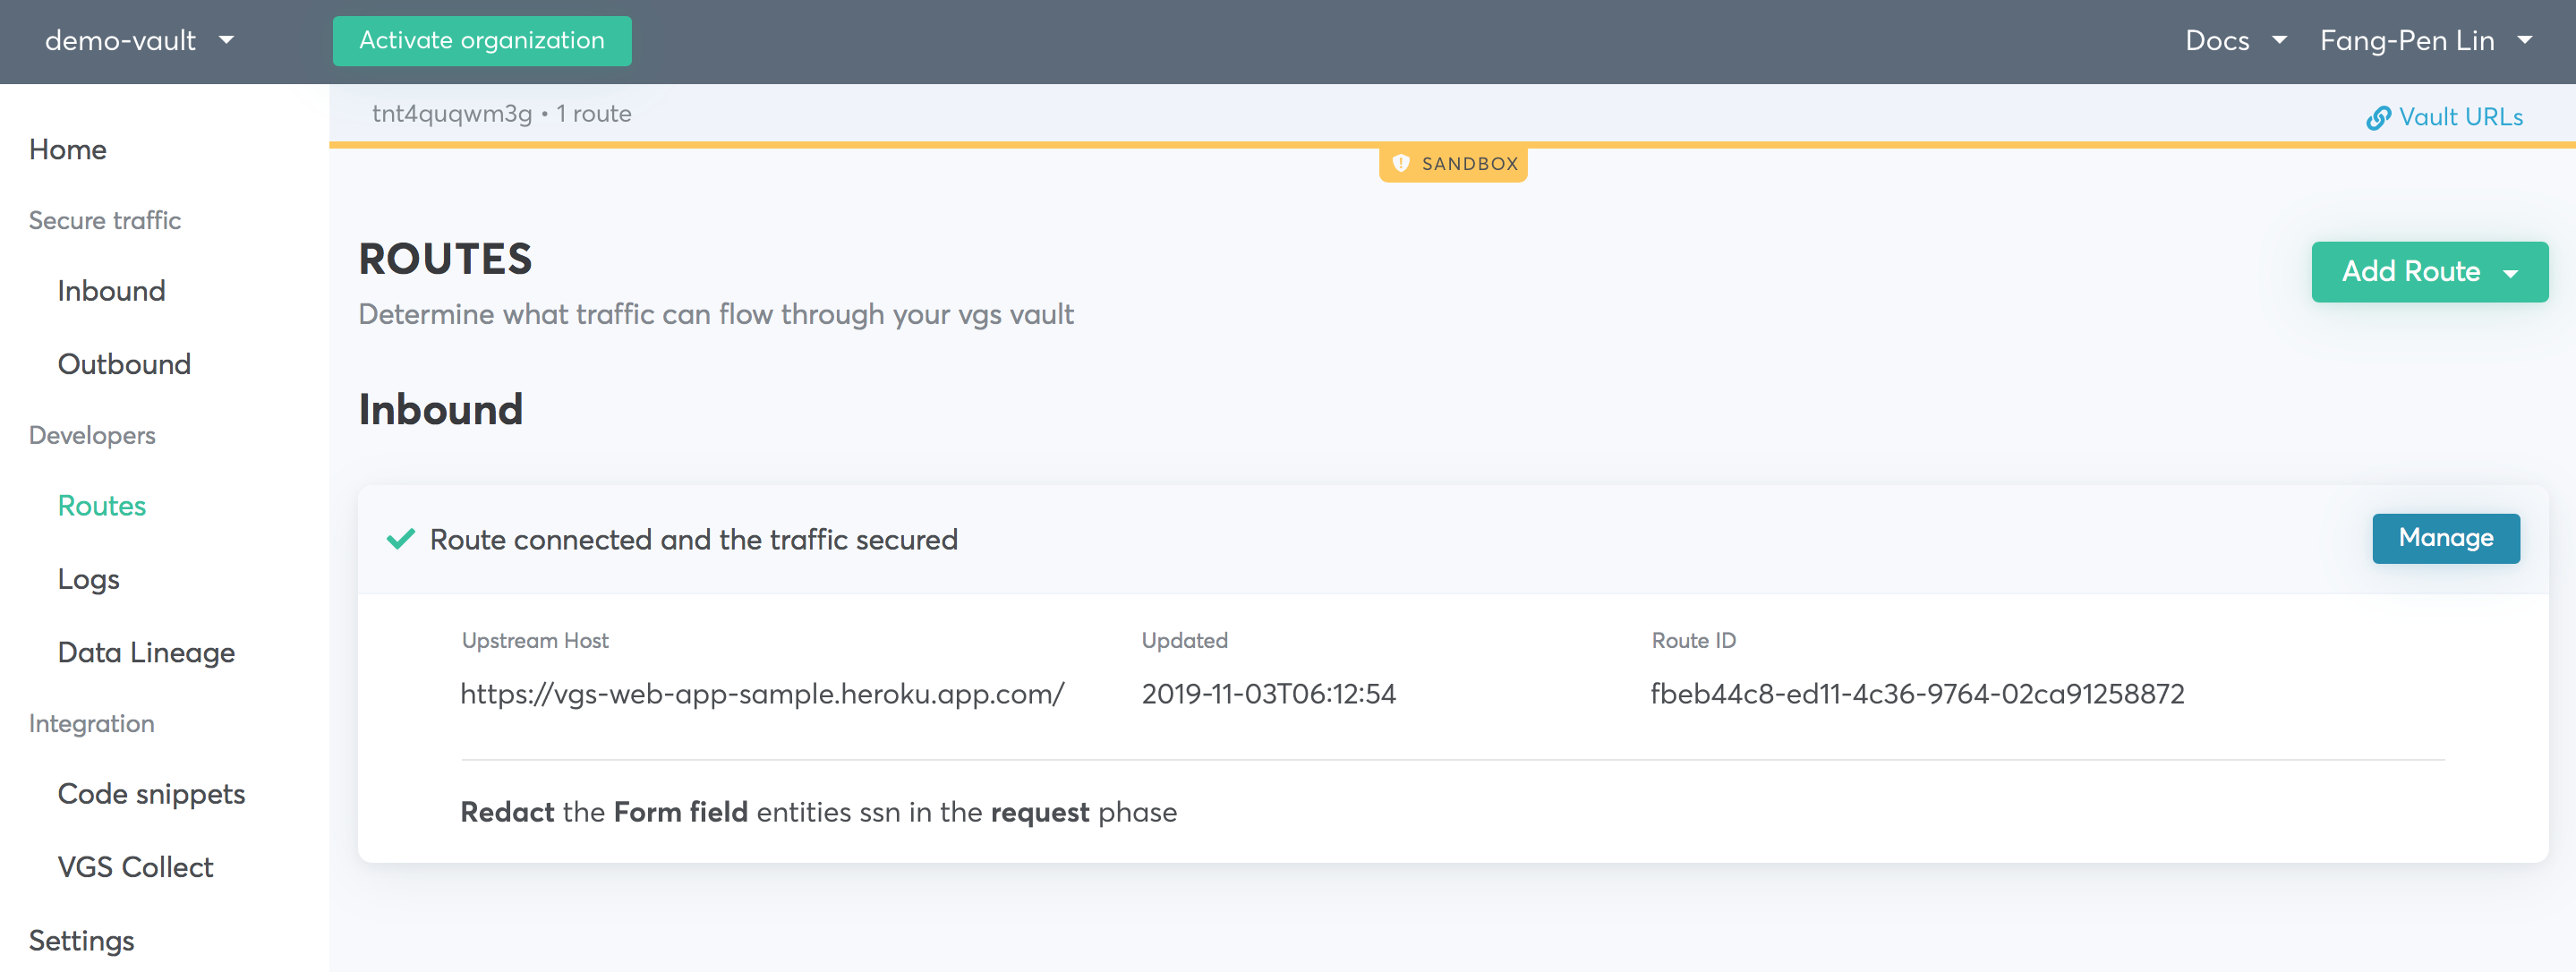
Now you should be able to see the inbound route we just set up:
Finally, it will now accept requests from the user directly, replacing the SSN with an alias as requested, and relaying it to our web app, like this:
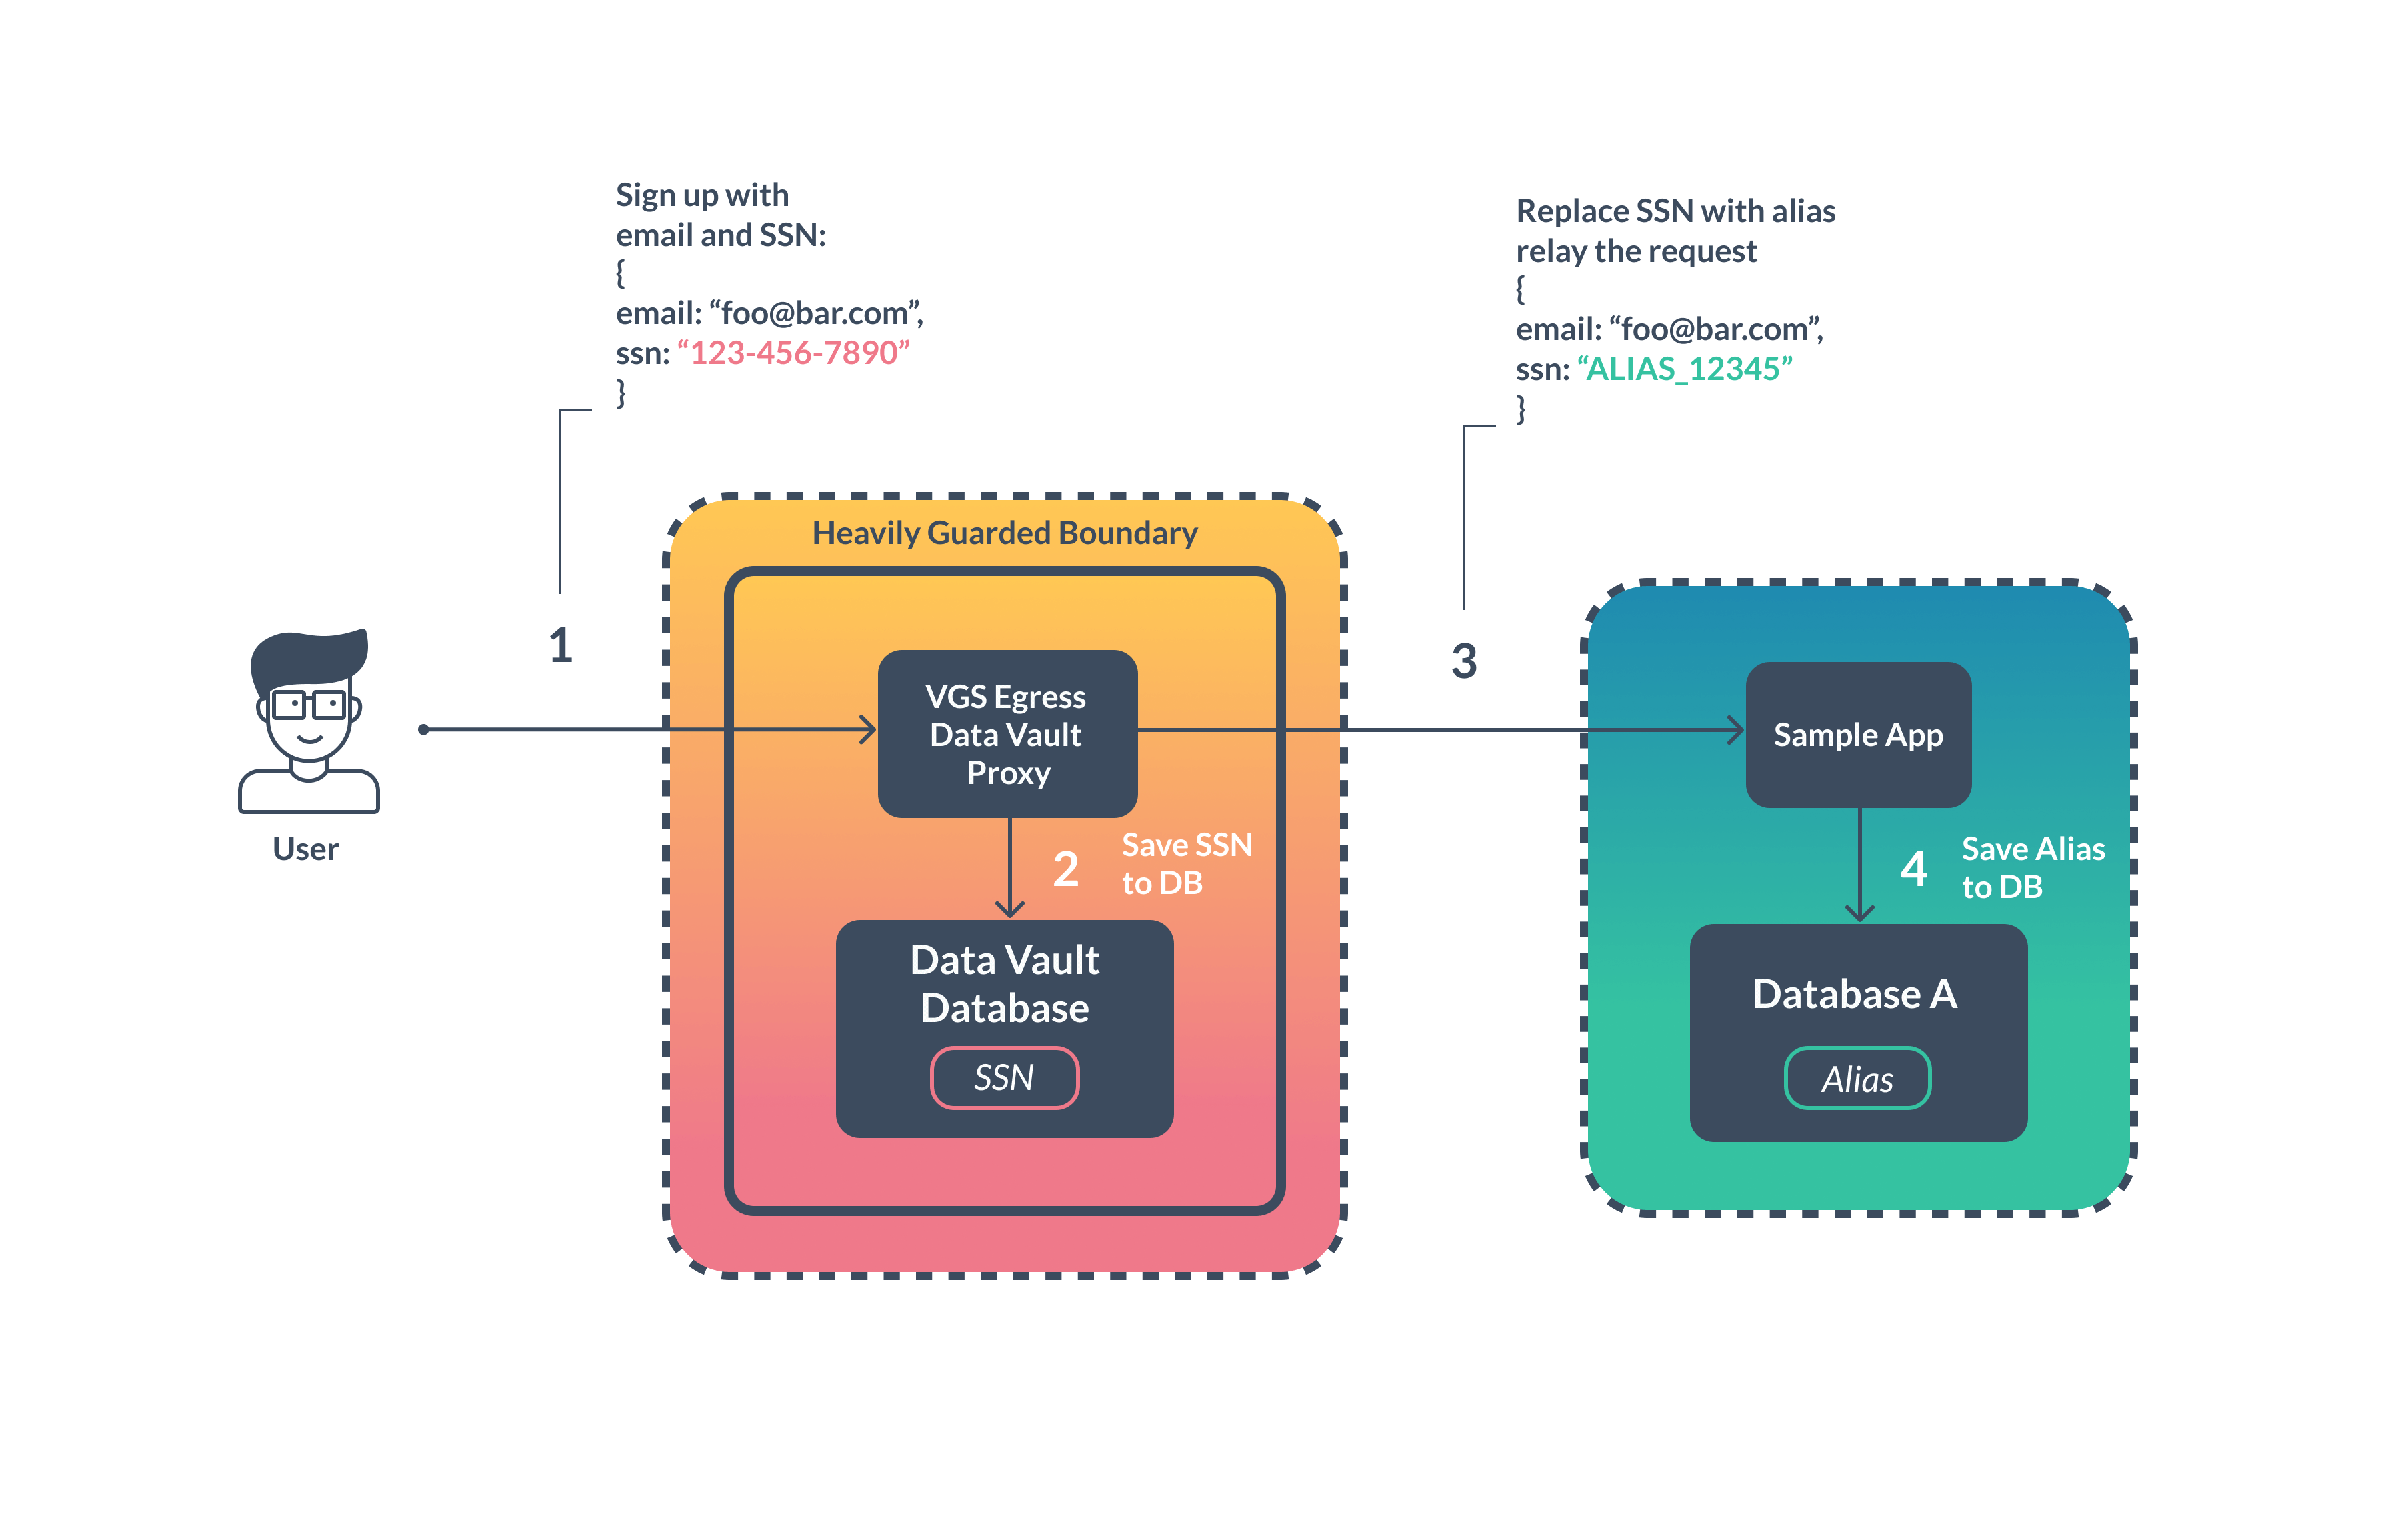
You should try it out by signing up for a new account, and you will notice the SSN is not plain text in the database anymore. It is now “tok_sandbox_jyuSWrMqxsAWAV4ZuxNiDj” instead of plain text, because the real value is saved securely with VGS and replaced with this referential alias before getting sent to our sign-up form endpoint.
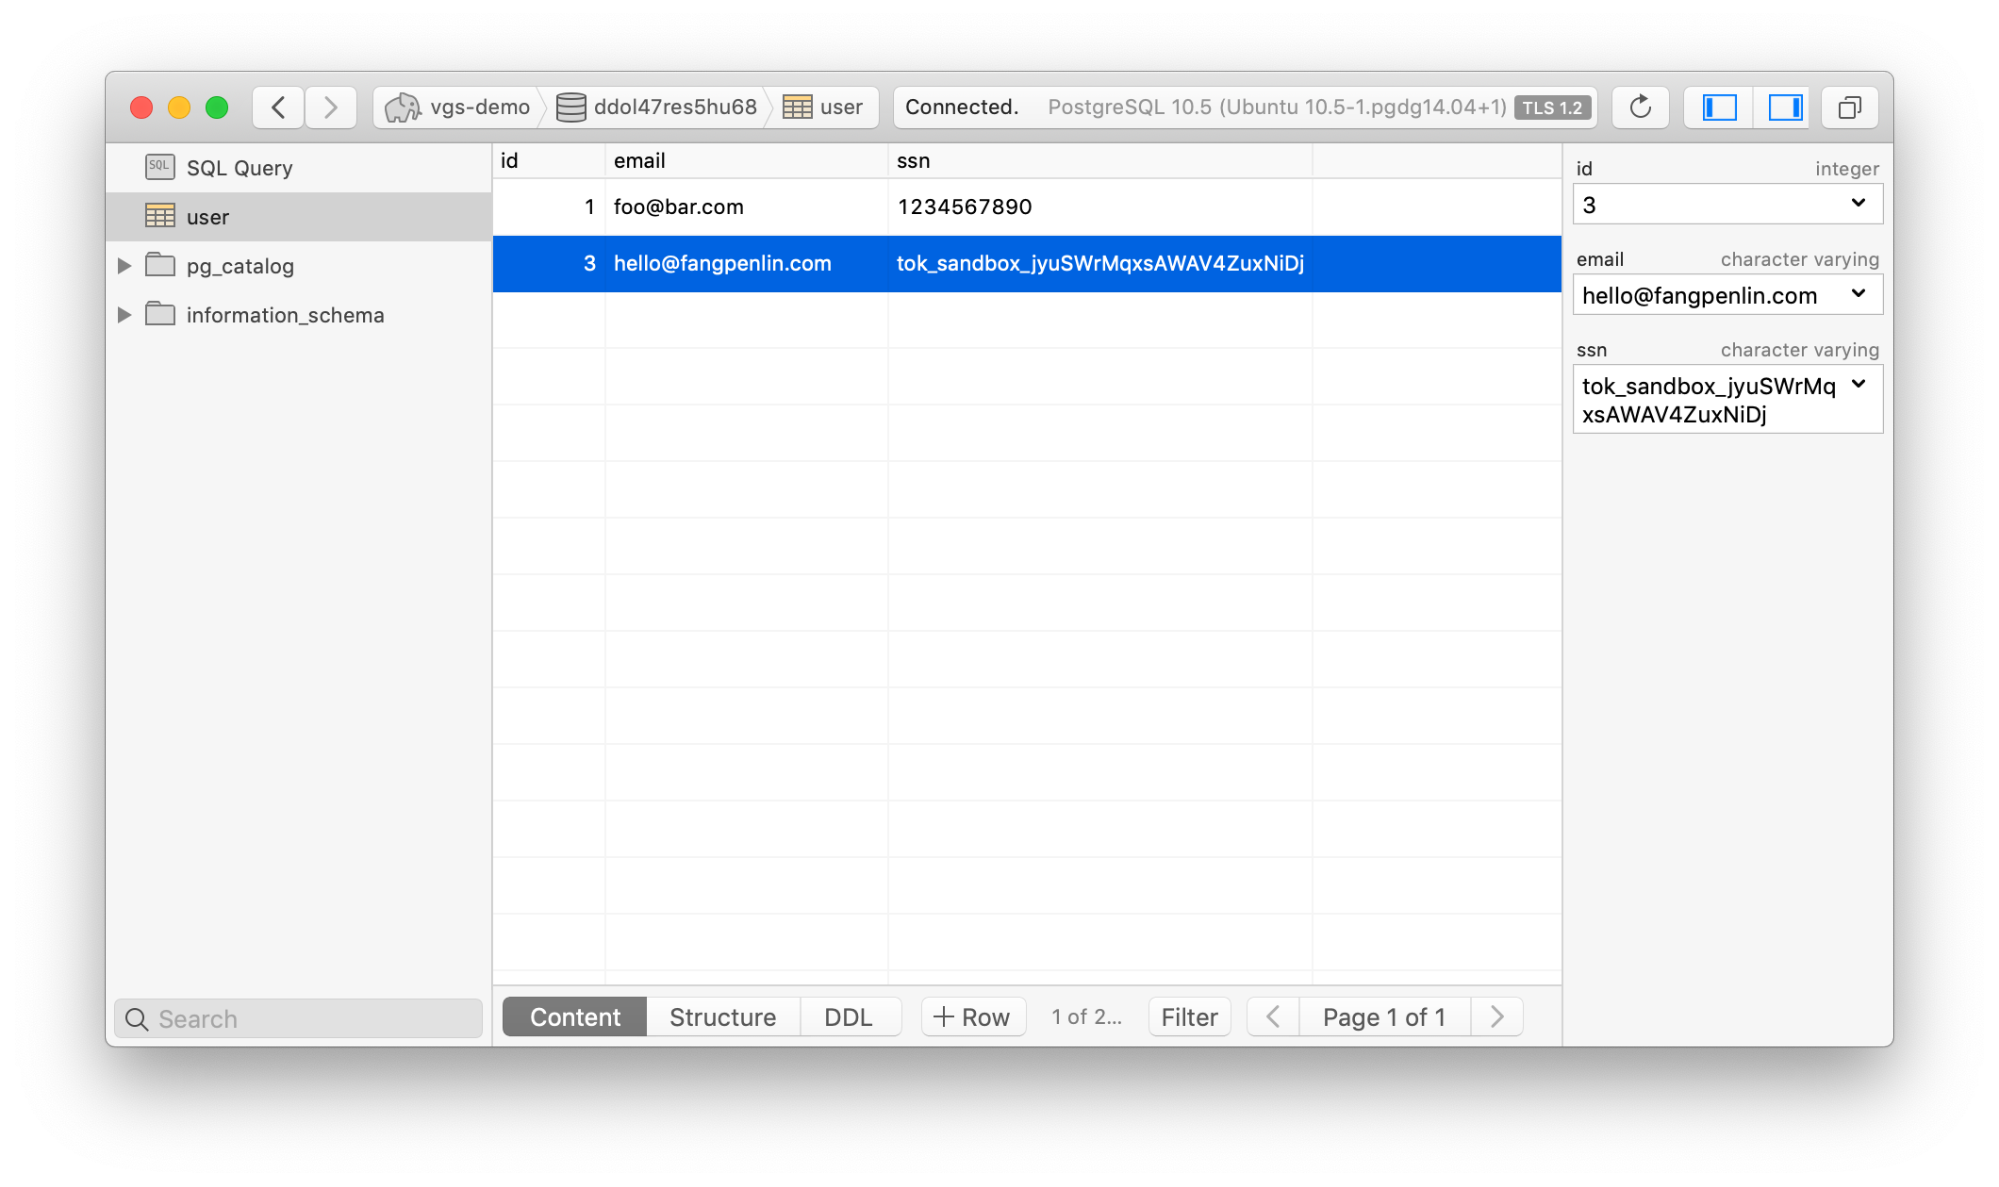
For now, your web app is completely free from touching the sensitive data! That’s great, but there remains just one problem: you don’t have the real SSN number now, so how can you request the credit score? Similar to the inbound route, you can set up an outbound traffic route for replacing an alias with the actual sensitive data for outgoing requests.
This time, let’s go to the “Outbound” secure traffic page.

Click on the “Secure traffic” button, and you will see the URL for your outbound traffic route displayed as:
https://<USERNAME>:<PASSWORD>@tntsyv550xu.sandbox.verygoodproxy.com:8080
Remember the credentials we downloaded after creating the vault? Let’s put the username and password into the URL to make it a valid outbound traffic route URL, and save it for later use. We also want to modify the code a little bit to make the route SSL verification work. We need to create a file “vgs-sandbox-cert.pem” with content copied from the “SANDBOX cert.pem” section.

Next, let’s change the code for sending our credit score request via HTTP route. You should change the code from
resp = requests.post(
    api_url,
    data=dict(ssn=user.ssn),
)
to
current_dir = os.path.dirname(__file__)
resp = requests.post(
    api_url,
    data=dict(ssn=user.ssn),
    verify=os.path.join(current_dir, 'vgs-sandbox-cert.pem'),_
)
This basically tells the HTTP client library to use the certificate provided by VGS. To make the HTTP client use the VGS route, you can then expose a “HTTPS_PROXY” environment variable in your web app server. If you’re using Heroku, for example, you can set the environment variable like this.

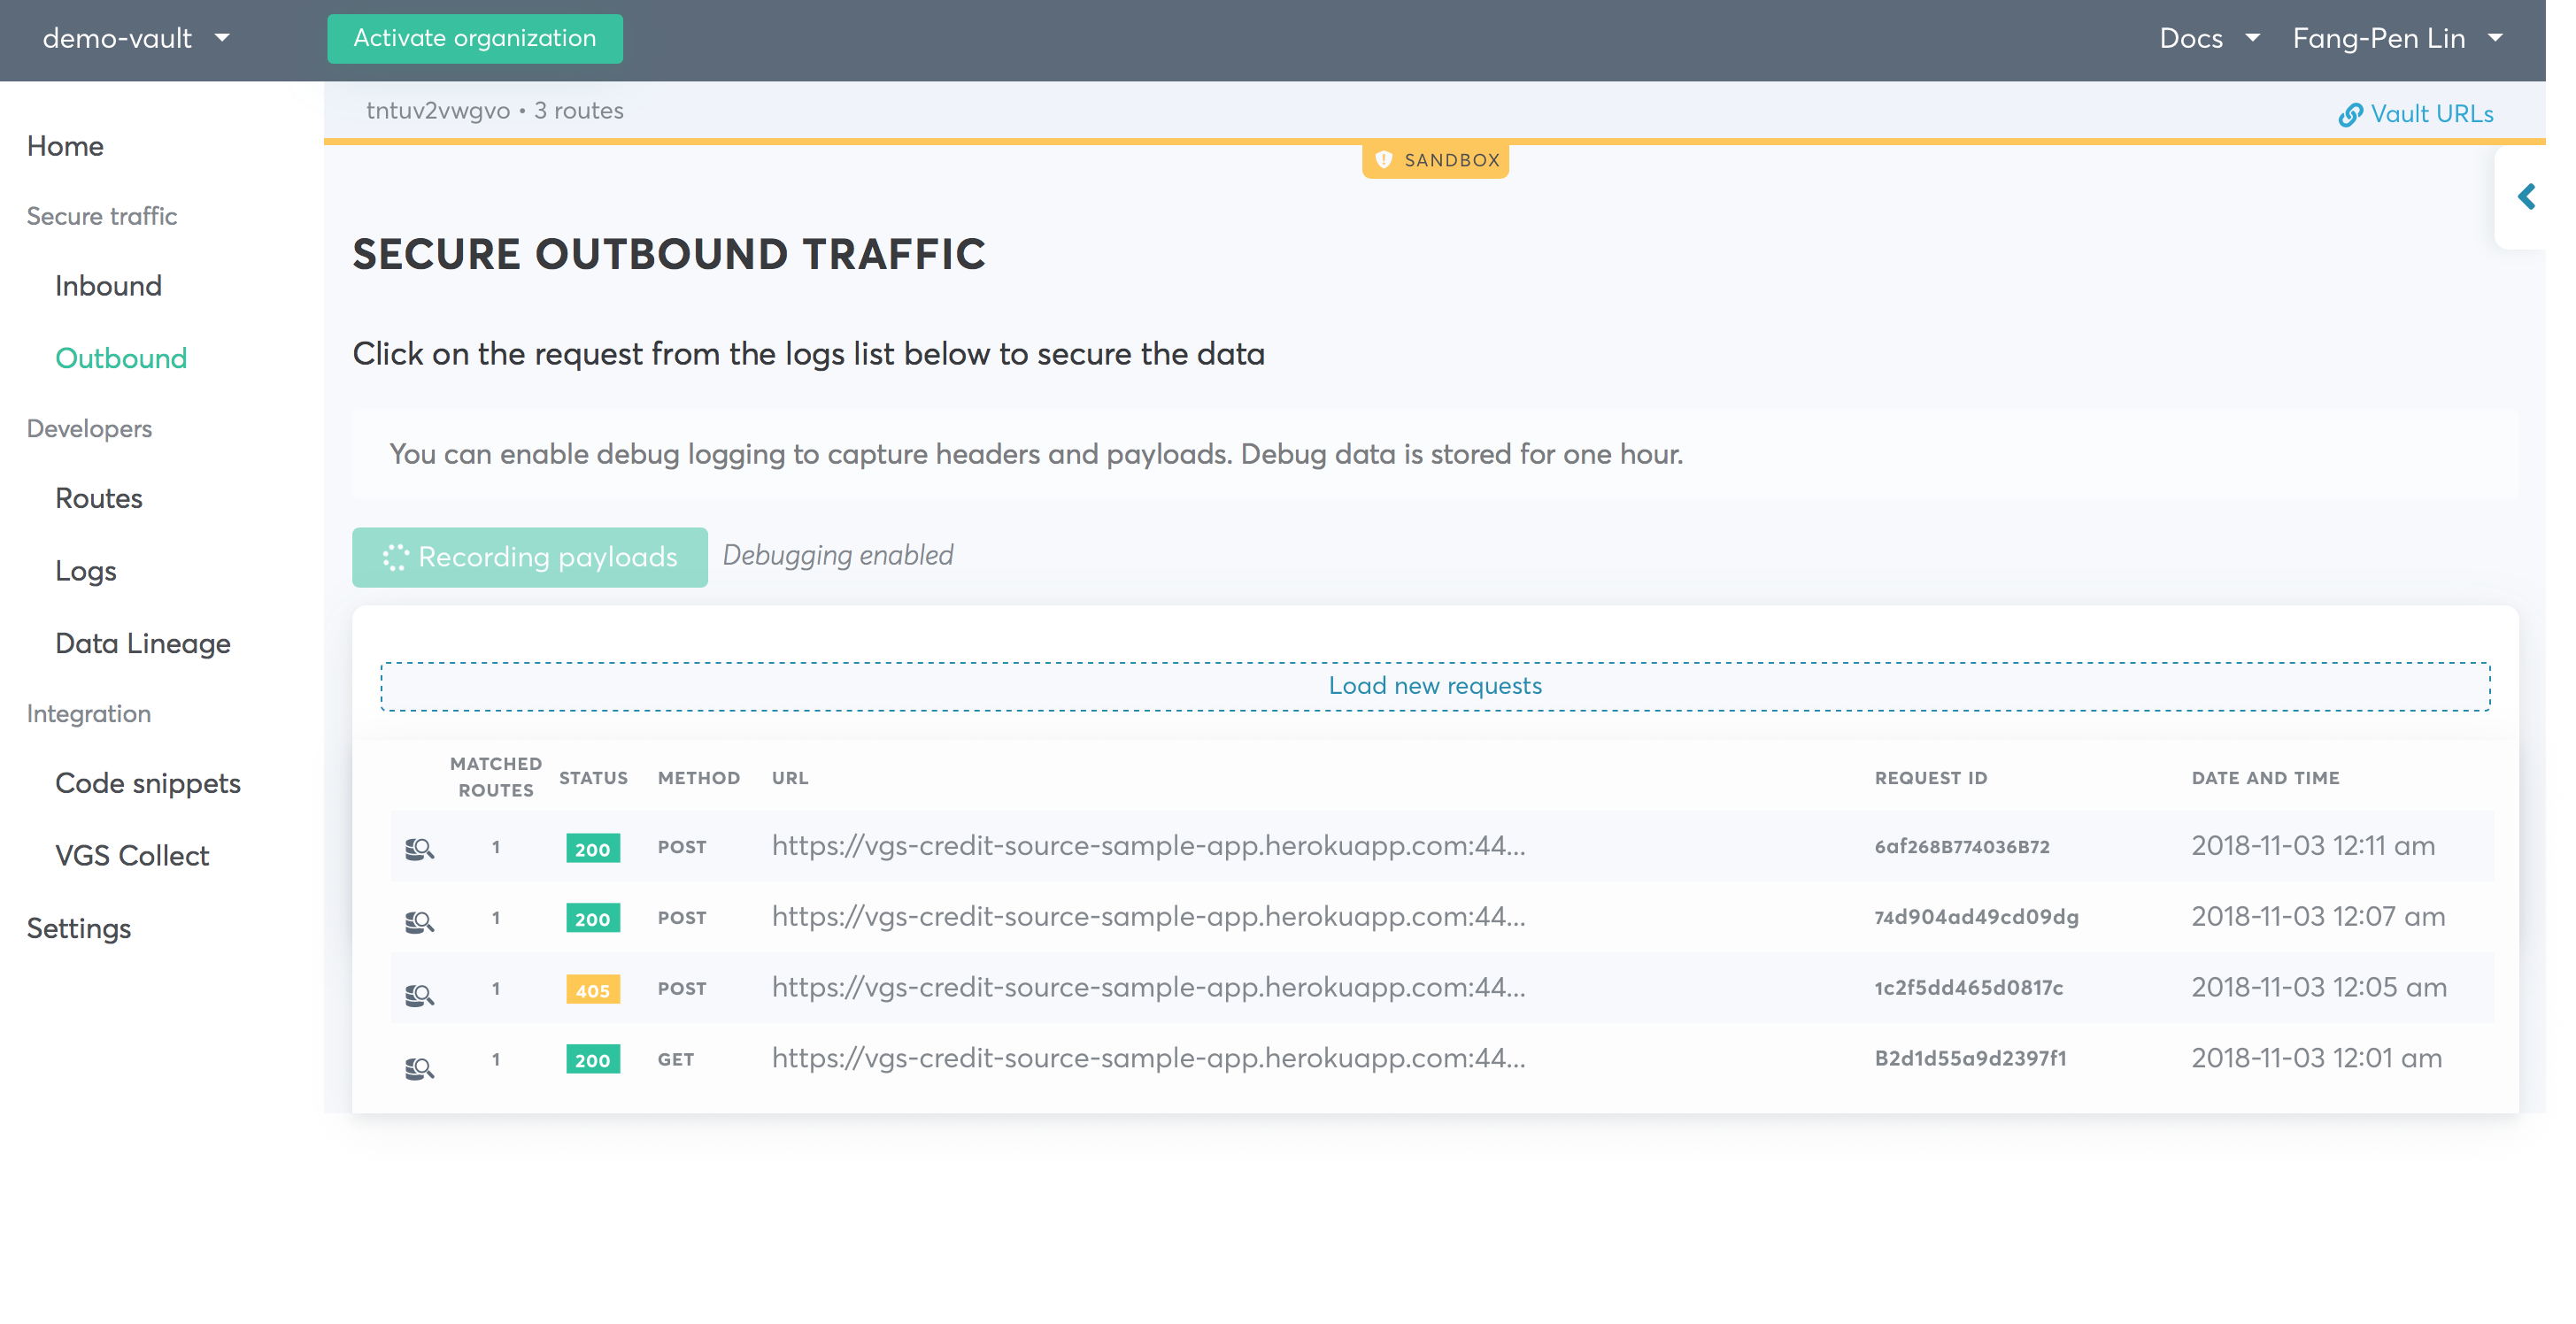
Now that our app is configured to query credit scores via VGS route server, it’s time to give it a try. After sending a request via our querying web page, you will see a request come in the access logs.
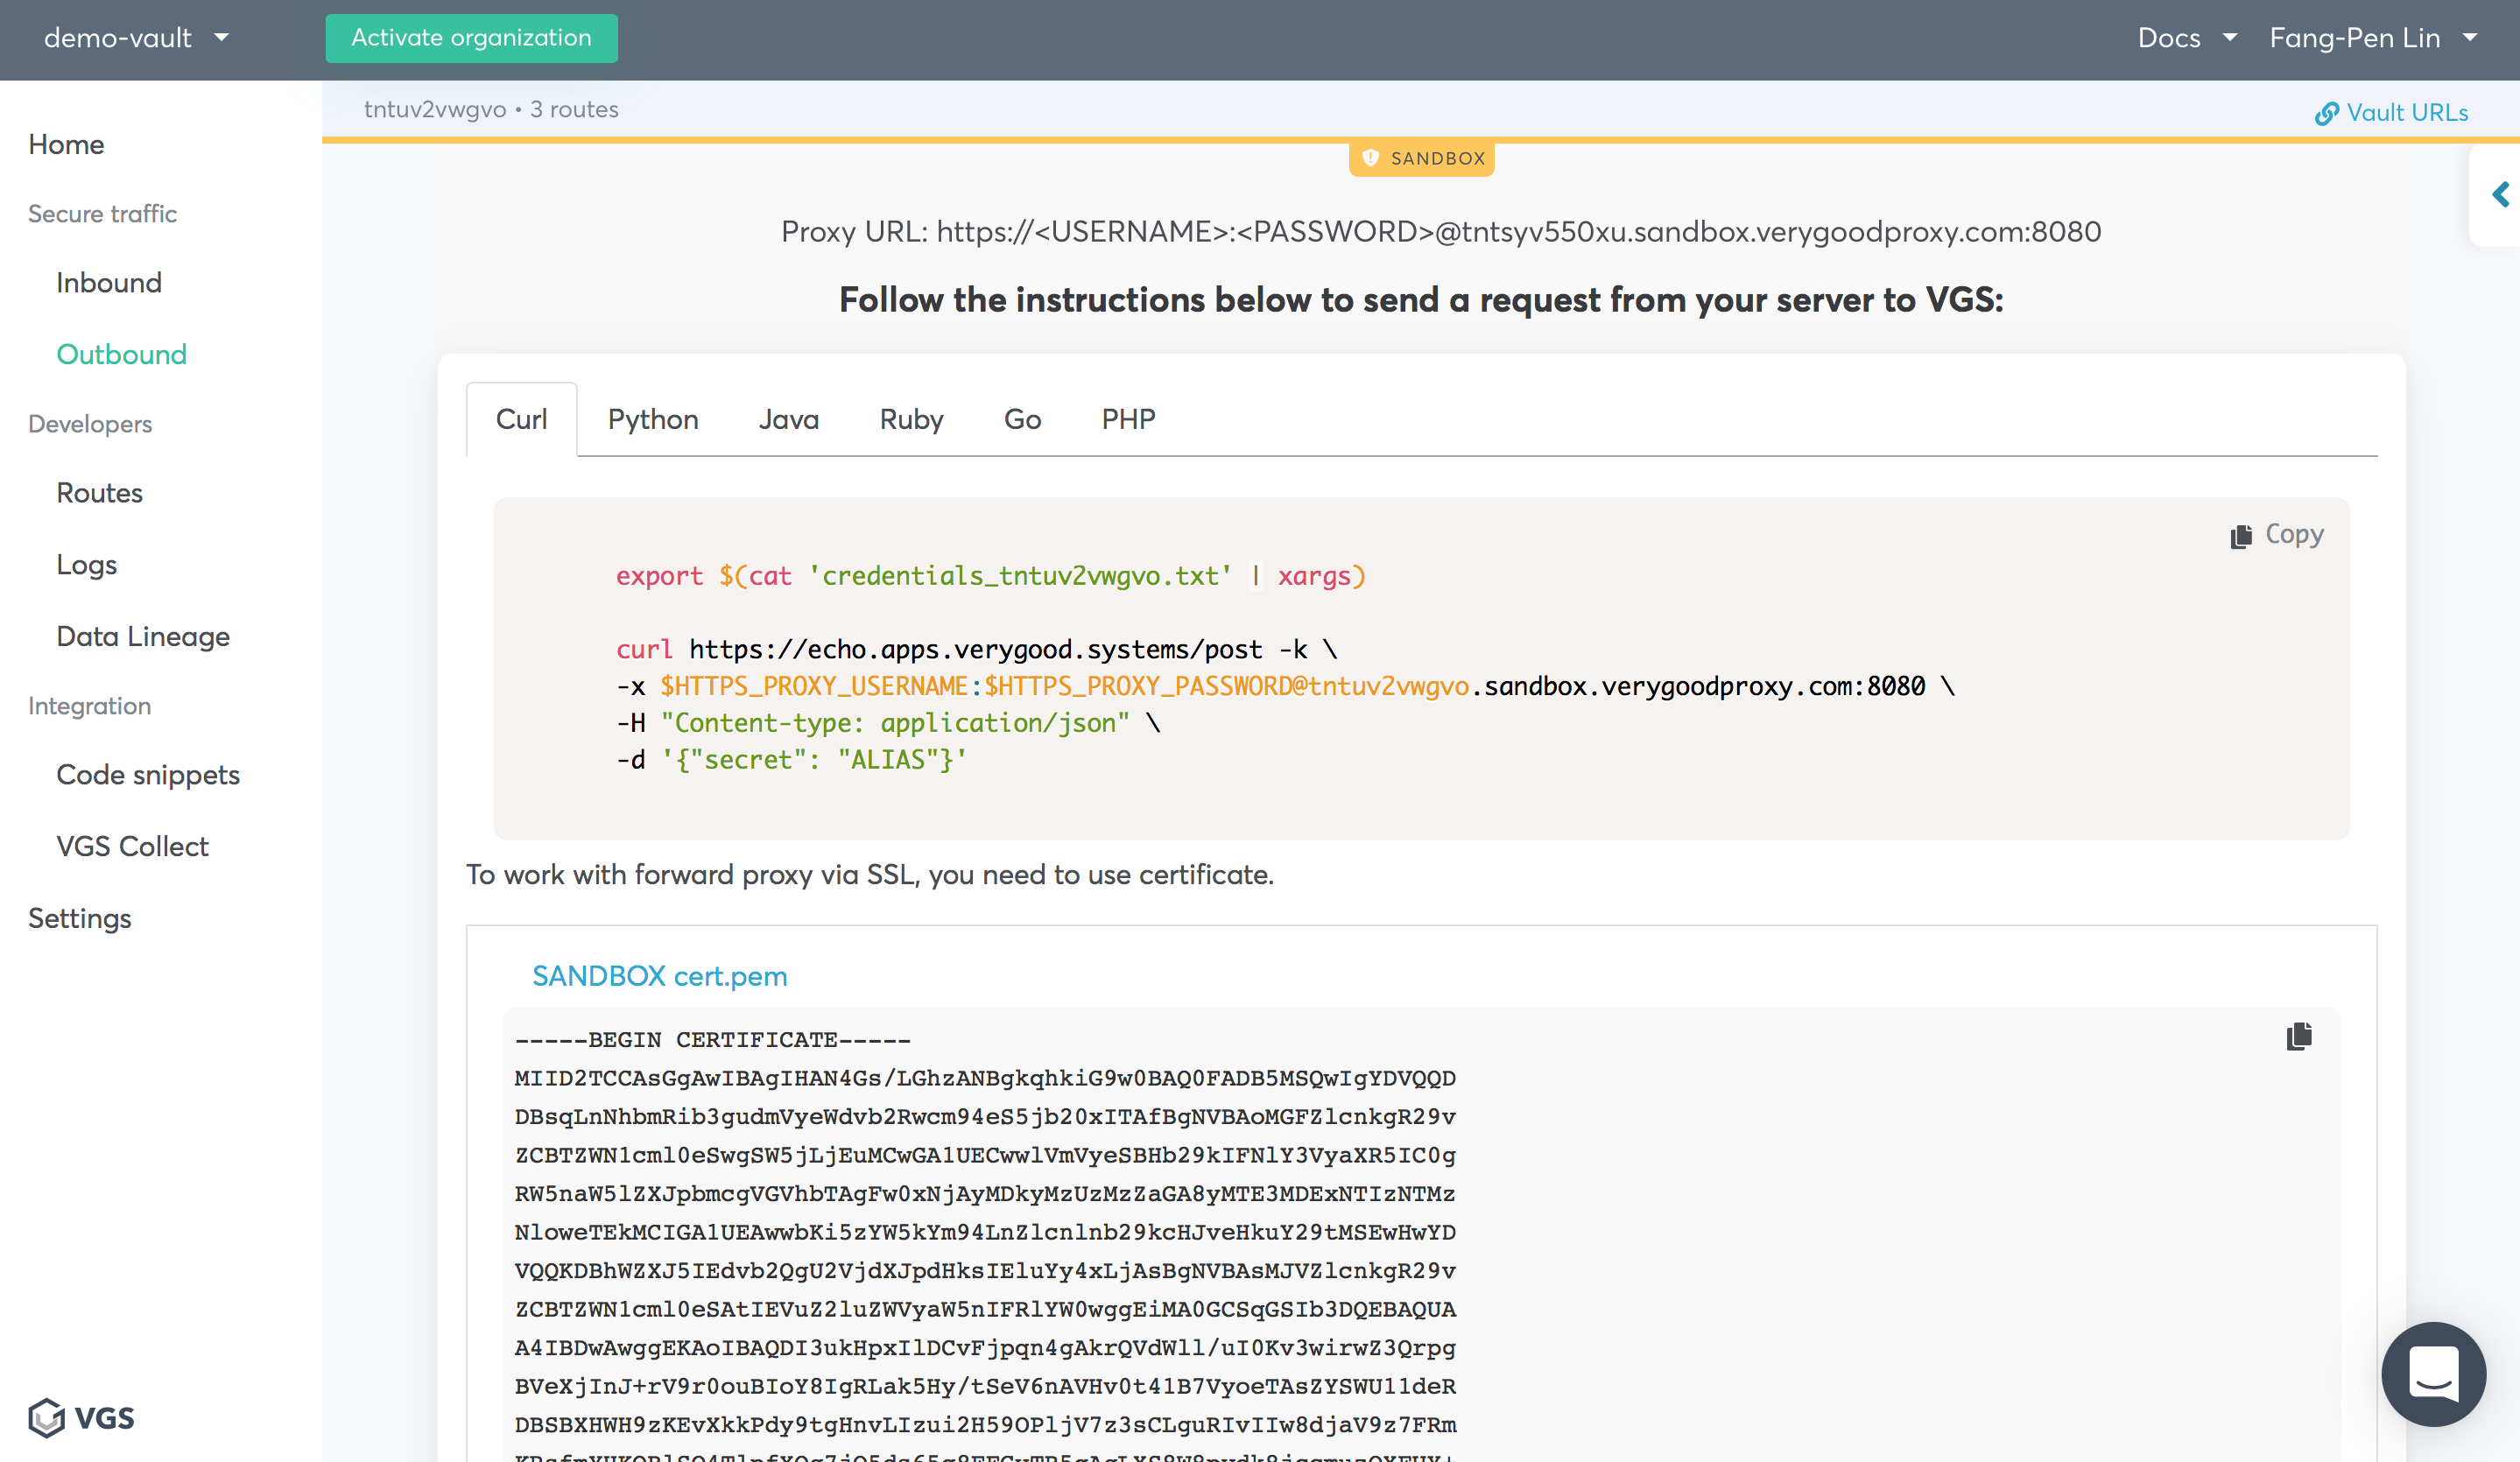
Find the right one, and click on it, then select “ssn”, and make the operation “Reveal” so that the alias will be replaced with real SSN. You can also select “Persistent” for storage and “Generic” for the format.
Finally, you can also save the route configuration. At this point in time, you don’t have the real SSN in your hand, but you can still query the credit score by sending the request through the VGS data vault egress route.
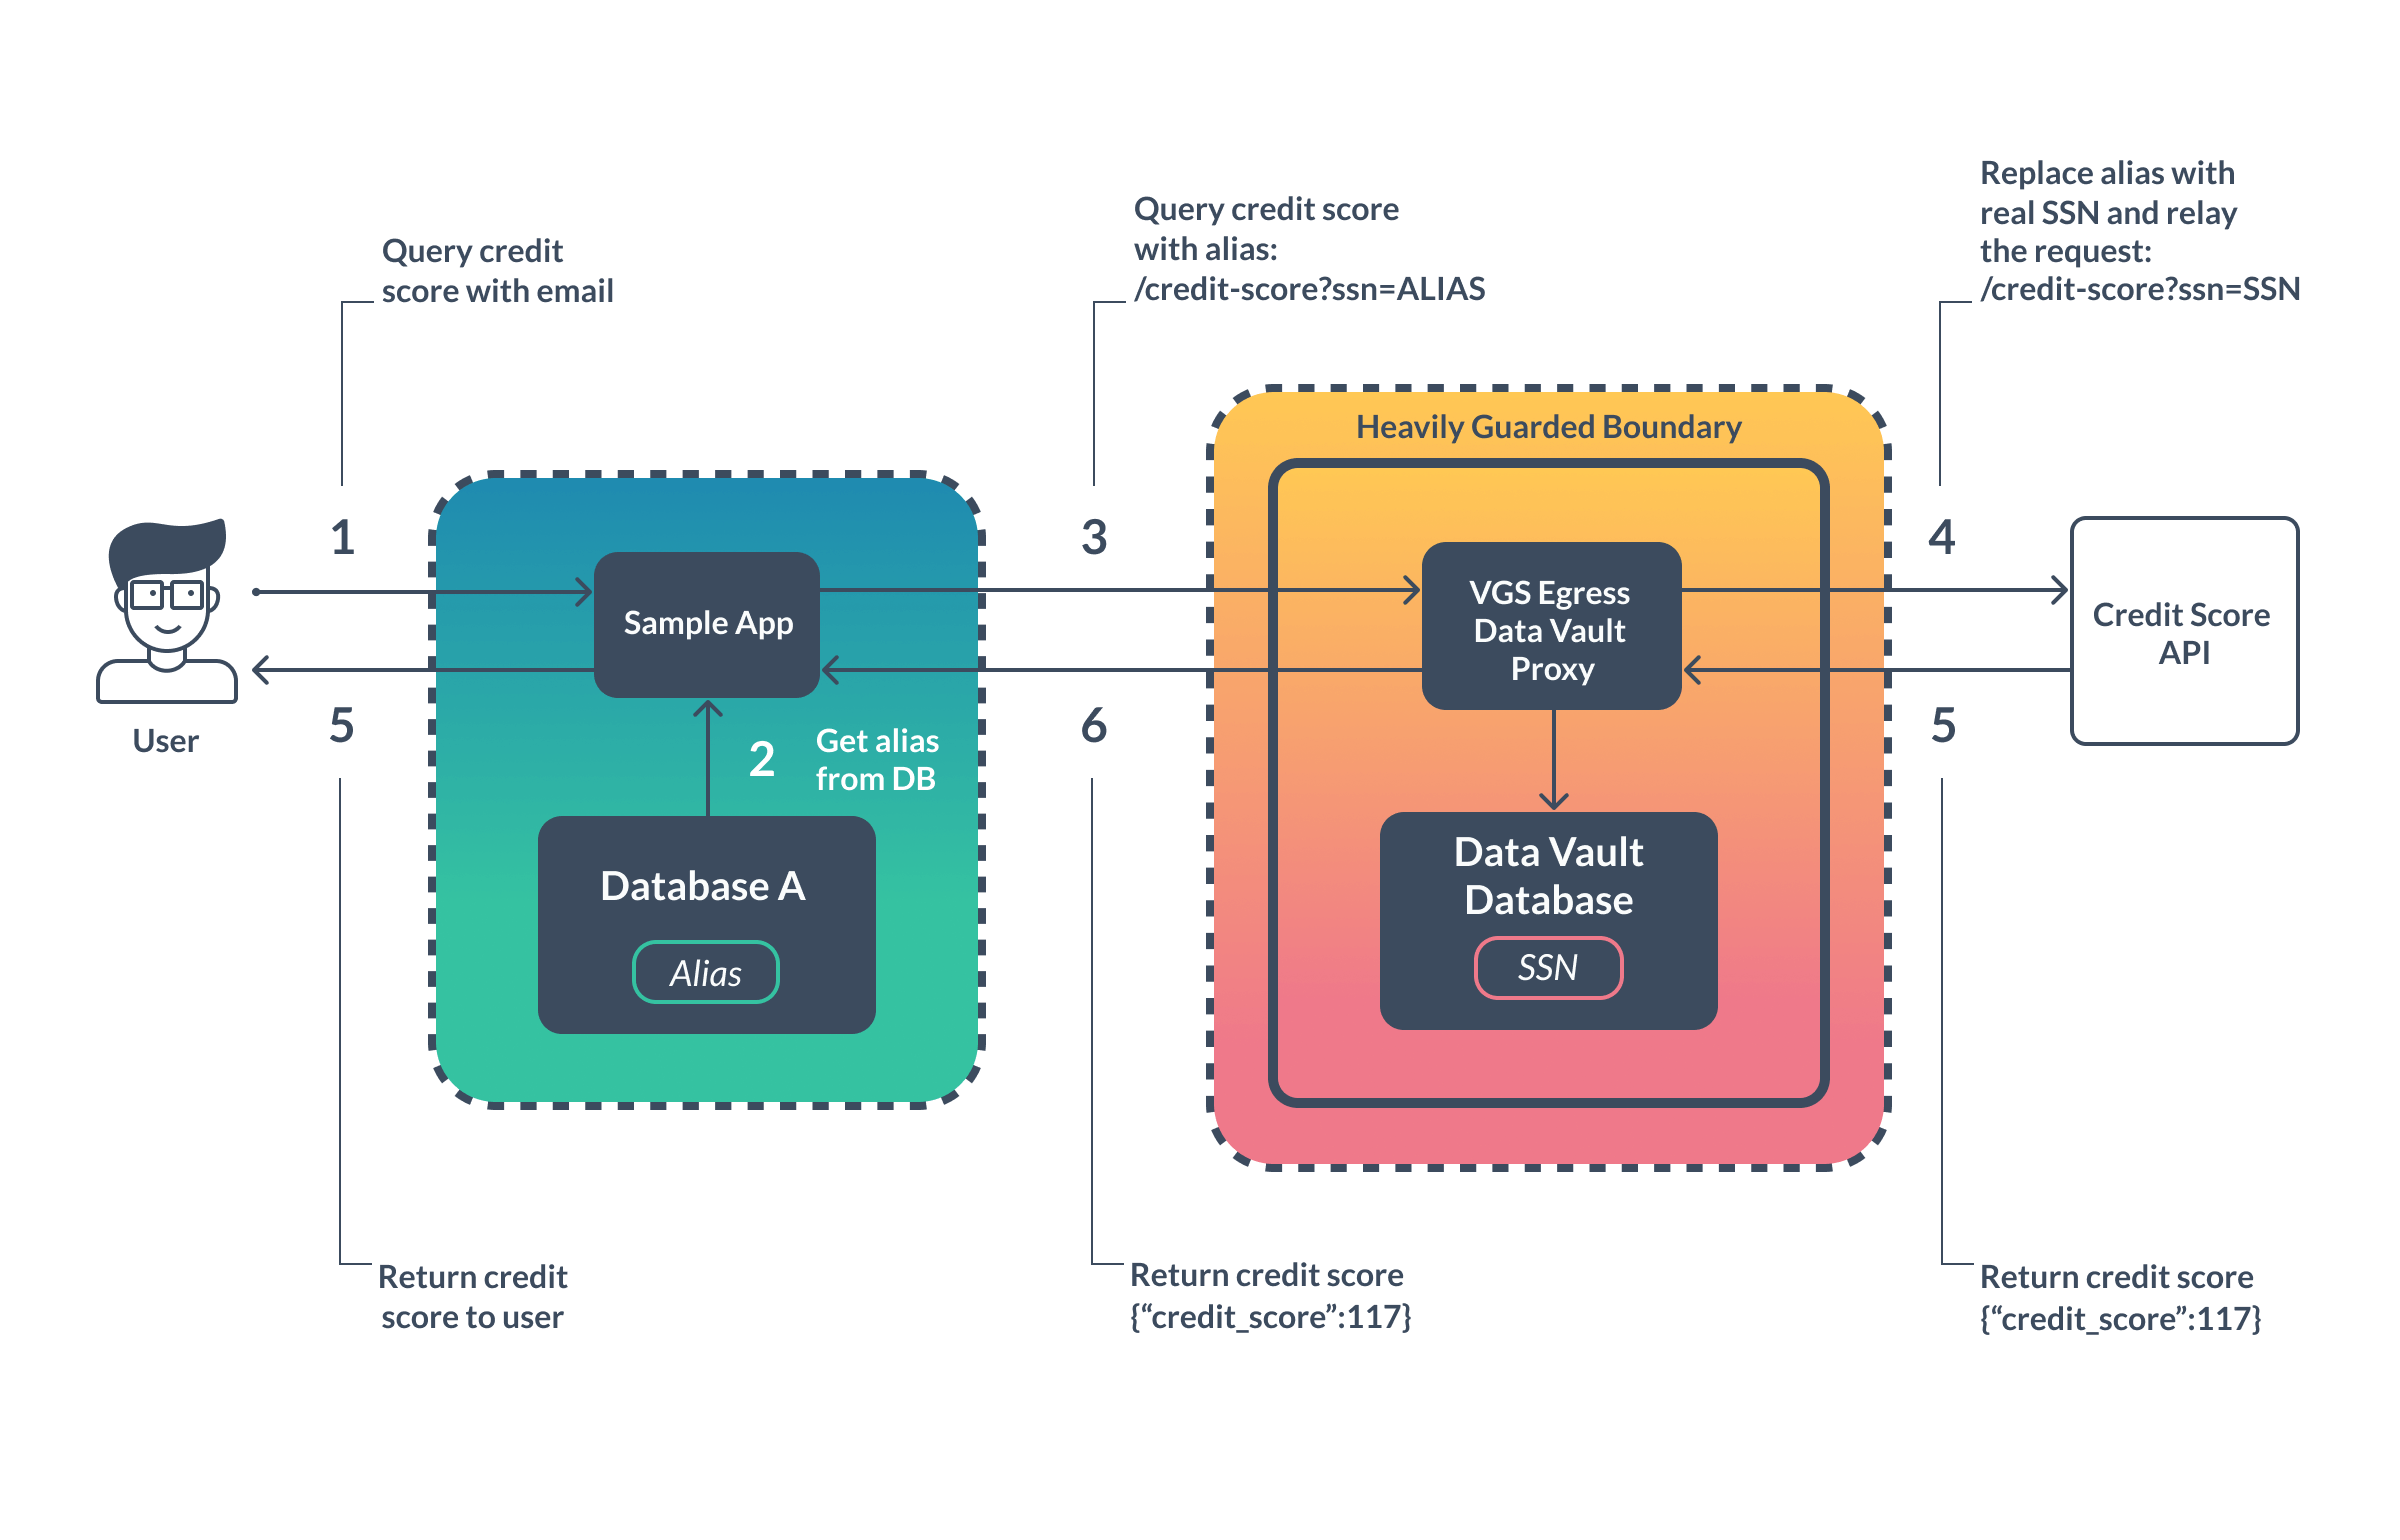
That’s it! We spent a few minutes making your app completely free of sensitive data and, therefore, secure.
With VGS, you can now make sure your data is secure from the very beginning. Compared to the risk of losing millions of dollars from a data breach, deploying a data vault is a wise choice that could protect your organization from a disaster. Moreover, it’s good engineering practice to take data security extremely seriously. Don’t make excuses to ignore security vulnerabilities - let’s make the internet more secure together with VGS!


